A major use for induction heating in industry is metal melting. Since I have an interest in metal casting, I decided to build a furnace suitable for melting small batches of aluminium for sand casting. I also wanted to see how well our Fluxeon [1] Roy product, especially our soon-to-be-introduced 2500 watt unit would work at this task.
The first step was to build a small prototype furnace capable of melting 5 or 6 pounds at a time.
 [2]
[2]The main ingredients
The main ingredients for this small furnace are shown here. The crucible is a squat propane gas bottle with its head cut off. The outer container is, of course, a KFC bucket, the large version (special thanks to the Athens, TN KFC for donating the bucket)
 [3]
[3]Cutting the Frax. Notice the gloves!
The cylinder is wrapped in FiberFrax spun alumina matting to electrically insulate the induction coil from the steel crucible.
Here my friend Matt is cutting from a blanket of Frax. Note the gloves! Frax is even more itchy than fiberglass!
 [4]
[4]Wrapped with fiberglass tape to hold the Frax in place.
The Frax is covered with fiberglass tape to hold it tight. This tape will burn off during the first heat but it is necessary during assembly. Other tape such as masking tape could probably be used but it would smoke and stink during the burn-out.
 [5]
[5]Winding the induction coil
Winding the induction coil. Based on past experience, I judged 6 turns to be just about right. It turns out that 7 turns would be exactly appropriate for the Roy 2500 while 6 are just right for the Roy 1500.
 [6]
[6]Finished melter assembly
The finished assembly. More fiberglass tape is used to hold the work coil in place. Note that the windings are concentrated toward the bottom of the tank. Heating the bottom most intensely greatly speeds getting that first melt started.
 [7]
[7]Proper Consistency of Kast-O-Lite
The next step is to mix the refractory. I used some Kast-O-Lite 3000 extreme temperature refractory because I had a spare bag laying around the lab. This is not the optimum refractory – it is heavy and has a relatively high thermal conductivity but it worked OK. I’ll be talking to my friends at Larkin Refractory [8]concerning the optimum refractory and an update will follow.
When using Kast-O-Lite, it must be mixed very dry. Larkin recommends the consistency of oat meal. I did some test casts and found out that a stronger product resulted if less water was used. The photo shows what it should look like. Lumpy but the lumps should adhere to each other if squeezed in the hand.
 [9]
[9]Greasing the inside of the KFC bucket
Before mixing the refractory, the inside of the KFC bucket should be heavily greased to make the refractory properly release from the mold. Don’t be miserly here, try liquid cooking oil, PAM or anything like that. The refractory will soak it up and you’ll find yourself picking pieces of the bucket off the cured refractory.
 [10]
[10]The Dry Refractory
This is what the refractory looks like dry. Like coarse cement mix.
 [11]
[11]Base layer of refractory laid down
The first thing to do is to lay down the base. This should be several inches thick, thick enough that the opening of the cylinder is level with the opening of the bucket.
 [12]
[12]Adding the Kast-O-Lite
Adding the refractory. Again, note how dry the mixture is. The foil cap makes it easy to add the refractory without spilling any into the crucible.
 [13]
[13]Tamping lightly
About every inch or two of refractory, take a stick or something similar and gently tamp the mixture. Not too hard or the paper bucket will bulge.
The cylinder will tend to work itself off center. If you see that happening, gently tamp on the thinner side. That will work the cylinder back toward the center of the bucket.
 [14]
[14]Almost done
Almost finished.
 [15]
[15]Finished furnace
Finished. Notice how the top is nicely rounded. The instructions say NOT to trowel the mixture smooth. I finished the surface by gently patting it with my gloved hand.
 [16]
[16]Slowing warming the cured refractory
The refractory is allowed to cure for 24 hours (don’t skimp) and then the assembly is gently heated to drive out the residual moisture.
In this photo the assembly is connected to a 2.2 model Roy and the heat is set to about 100 watts. At this point the bucket is stripped off to allow the moisture to escape out the sides.
 [17]
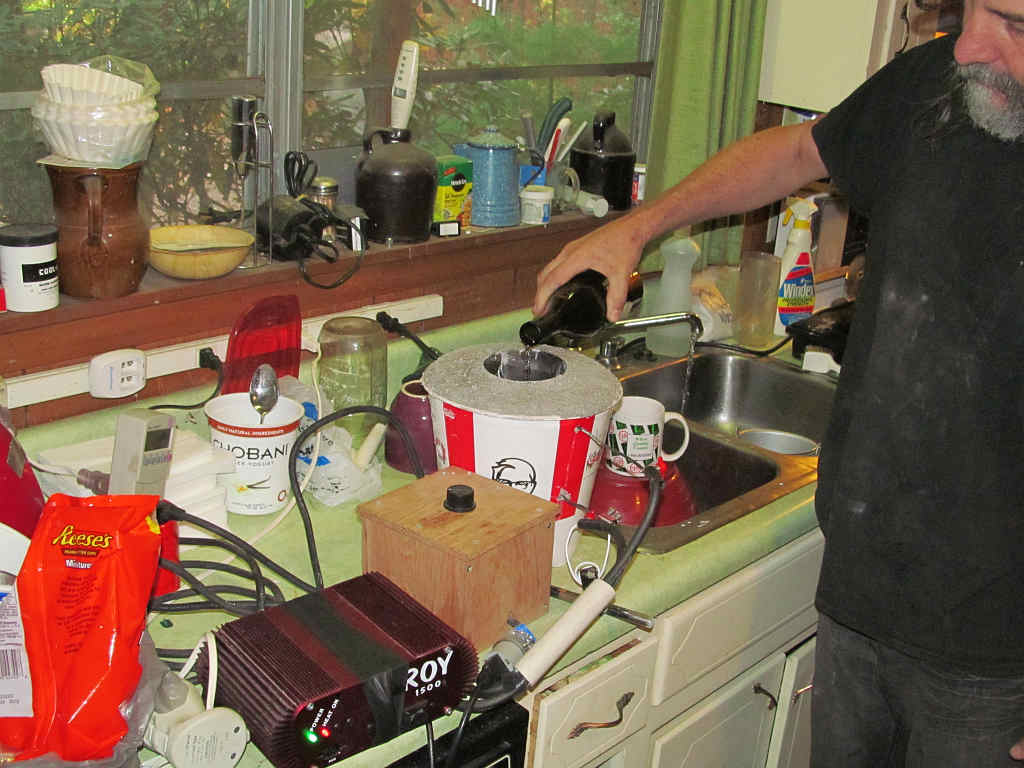
[17]The Secret ingredient
Here Matt adds the secret ingredient :-).
Actually it’s just water. We filled the crucible up with water so that it would boil for awhile and hold the temperature at about 210 deg F. That let the heat slowly soak through the refractory.
The refractory instructions say to raise the temperature about 100 deg F per hour. We did that until the interior of the crucible was showing some color. Then we attached the 2500 watt Roy and fired for effect!
Note that if there is enough interest, Fluxeon will sell ready-made furnaces in a variety of sizes. This is a good size for small castings up to about 5 lbs (allowing a pound for the sprue). Next on my agenda is a 20 lb furnace built inside a 5 gallon steel pail. Stay tuned.
Next Instalment: Using the furnace.
—