- Announcements
- BBQ and Food
- Cars
- Computing
- Cool Stuff
- Current Events
- Electric Vehicles
- Electronics
- Energy
- Flashahaulism
- Funny
- Government
- Hints and Tips
- History
- HVAC
- Induction heating
- Internet
- Lighting
- Misc
- Neon and other lighting
- Nuclear
- Personal
- Pets
- Philosophy
- Photography
- Power Generation
- Product Reviews
- Projects
- Q and A
- RV/Camping
- Science
- Tellico
Categories
Blogroll
 Print This Post
:
Print This Post
Print This Post
:
Print This Post
New Discussion Forum
PermaLink
Hey guys,
I’ve just set up a discussion forum so that y’all can discuss my articles. Here is the permalink.
I’ll enter it on the blog roll as soon as I remember how again.
Posted by neonjohn on March 24th, 2023 under Announcements |
1 Comment »
Print This Post
:
Print This Post
The Alec Baldwin Murder Case
PermaLink
Update 01/21/23 – In the photo, I mis-identified the cylinder pusher as the sear. Sorry. My description of how the gun works is correct.
———–
Oct. 21, 2021 Alec Baldwin was allegedly handed a fully loaded Colt Single Action Army (Cowboy gun) replica pistol, allegedly fully cocked it, pointed it at Halyna Hutchins, allegedly pulled the trigger and shot her in the chest, killing her instantly and wounding another person. Yesterday, January 19, 2023, the New Mexico prosecutor announced that Baldwin and the movie’s armorer will be charged with 4th degree involuntary manslaughter.
In this article I’m doing a technical analysis of what happened and offer my opinion as to why Baldwin’s denial of pulling the trigger cannot be true. My analysis is based on:
- I’m a life-long shooter.
- For over 30 years I was an NRA-certified Firearms Instructor.
- I own an original Colt .45 SAA pistol.
- I’ve been an amateur gunsmith for most of my life.
The leftist media is making all kinds of excuses for Baldwin, a prominent anti-gunner, and citing a lot of facts that are totally irrelevant. True, there should not have been live ammo on the set. True, set members should not have been target practicing with the revolver. True, the armorer should have made sure the gun was empty.
BUT. Once Baldwin took that gun in hand, none of that matters. It all falls away. The ONLY thing that matters is that he did not clear that gun before handling it. That is, he did not check to make sure it was unloaded before handling it. A person who receives a gun has the moral and legal obligation to make sure it is unloaded and safe BEFORE he further handles it. Let’s explore things.
This is my Colt 45 SAA.

Colt 45 Single Action Army “Cowboy Gun”
This is my “Cowboy Gun”. This is the same gun that Baldwin used but his was a replica with different dress and mine is the real thing. In the subsequent photos, the gun is kinda dusty. Sorry about that but it’s been laying on my desk table for several years.
Colt 45 SAA loading gate closed
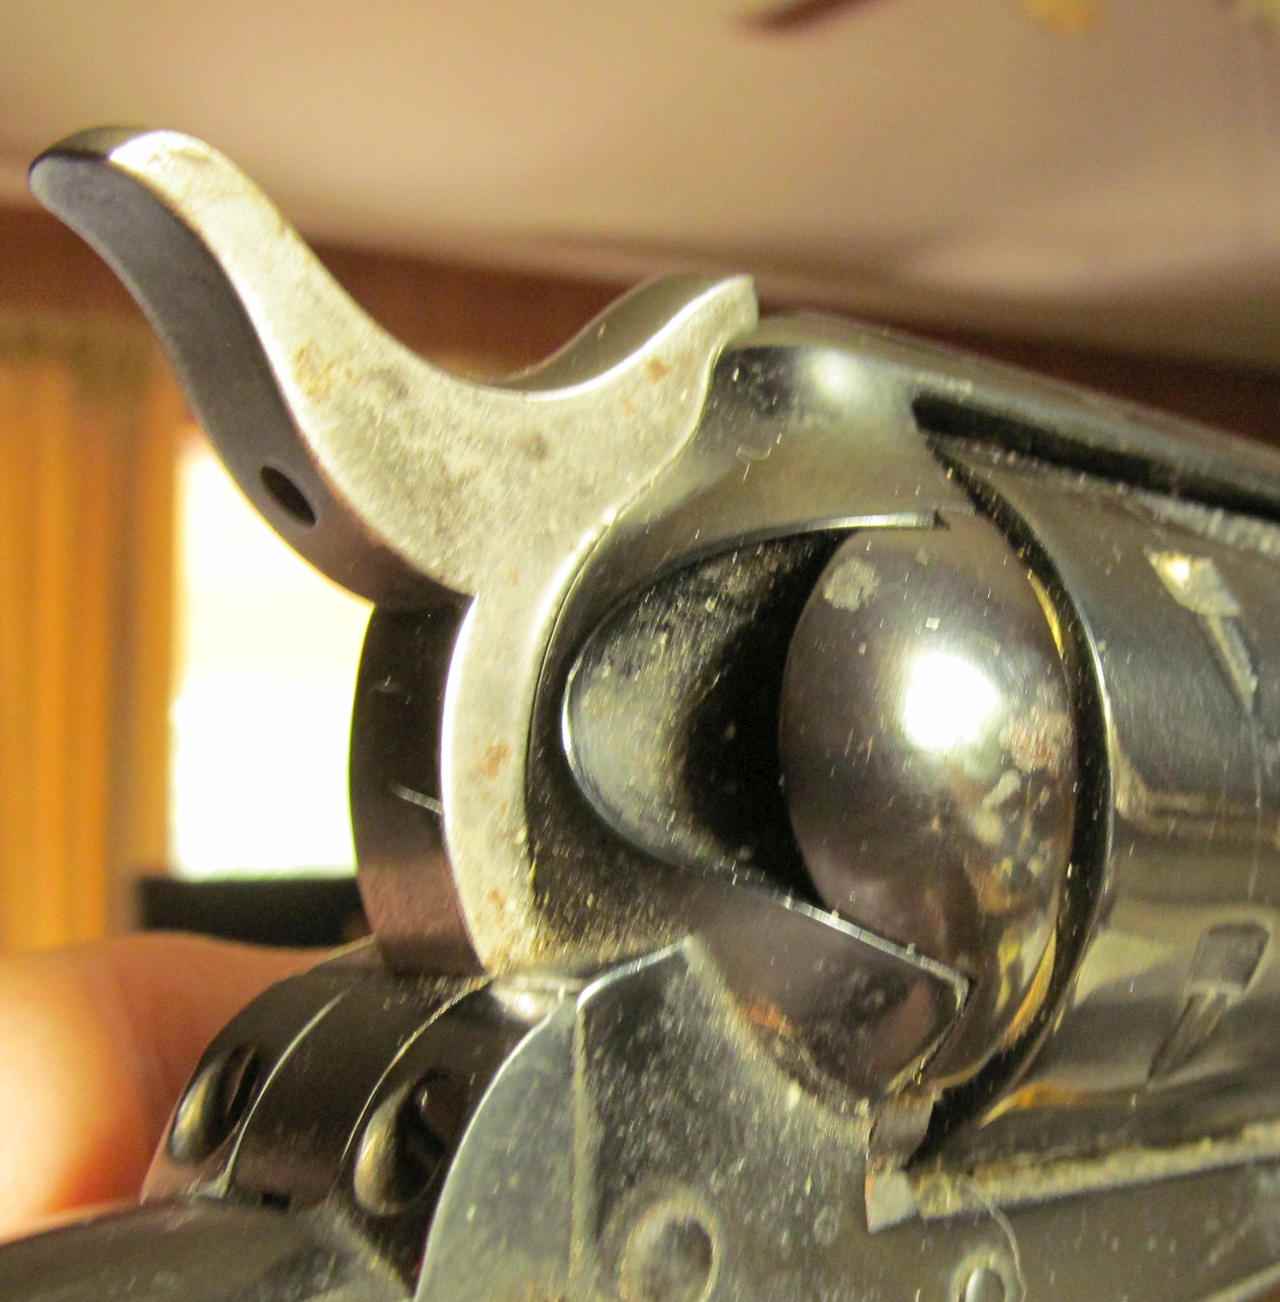
When Baldwin received the pistol, this is what he would have seen. In the center of the photo is the loading gate. This gate is opened to load the gun or to check whether it is loaded.
Colt 45 SAA checking loaded status from gate
Gate open. It’s quite evident that the gun is loaded.

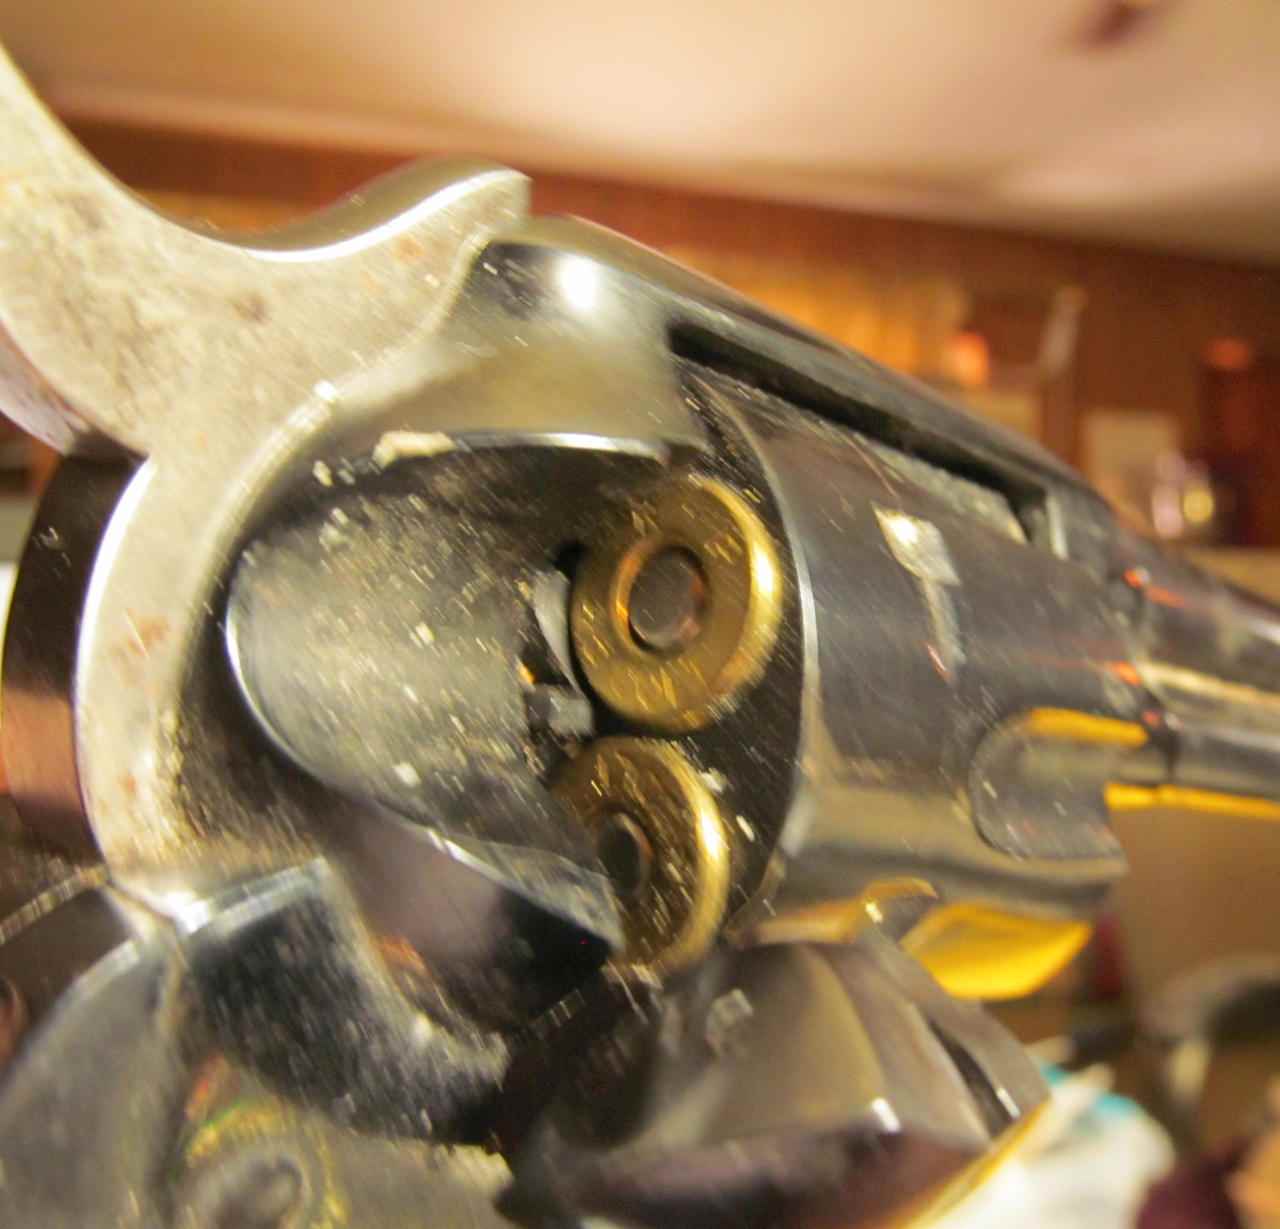
Colt 45 SAA empty cylinder
This is the same view that clearly shows that the weapon is unloaded and clear. Of course, the cylinder must be spun to make sure all 6 chambers are empty.
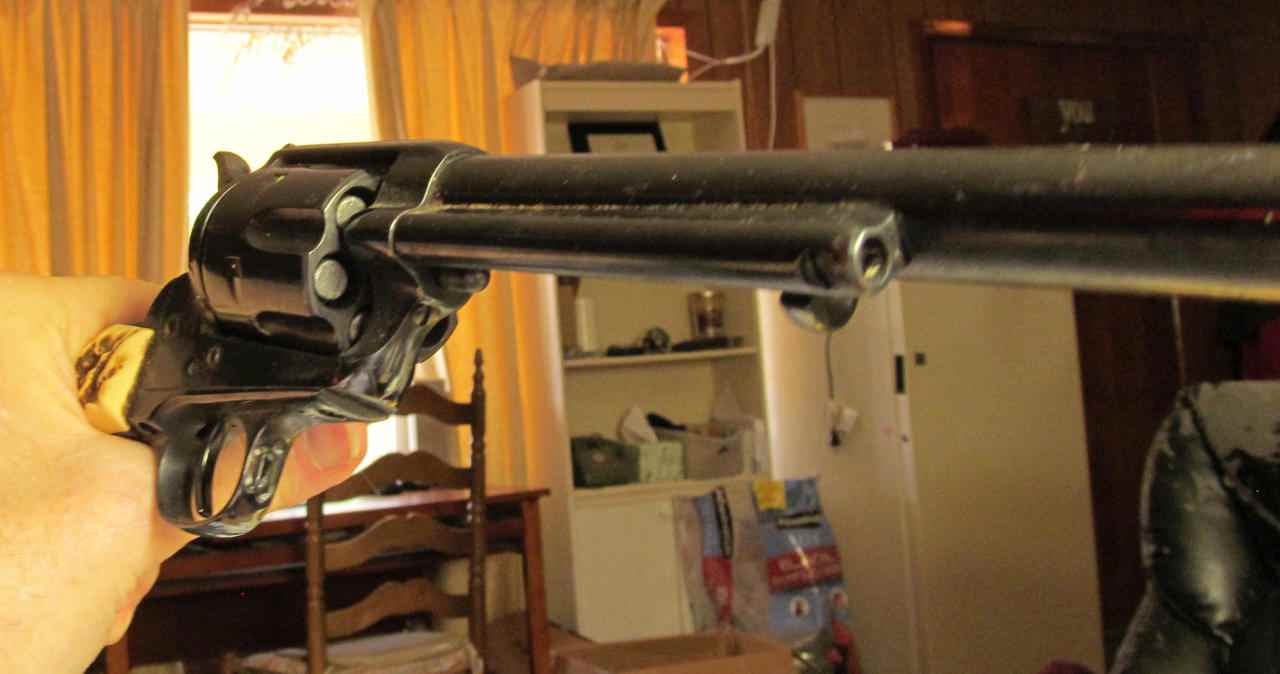
Colt 45 SAA Checking loaded status from the front
Baldwin didn’t even have to open the gate. He could have determined the loaded status by merely looking into the front of the cylinder. People in front of the pistol could also see that the gun is loaded.
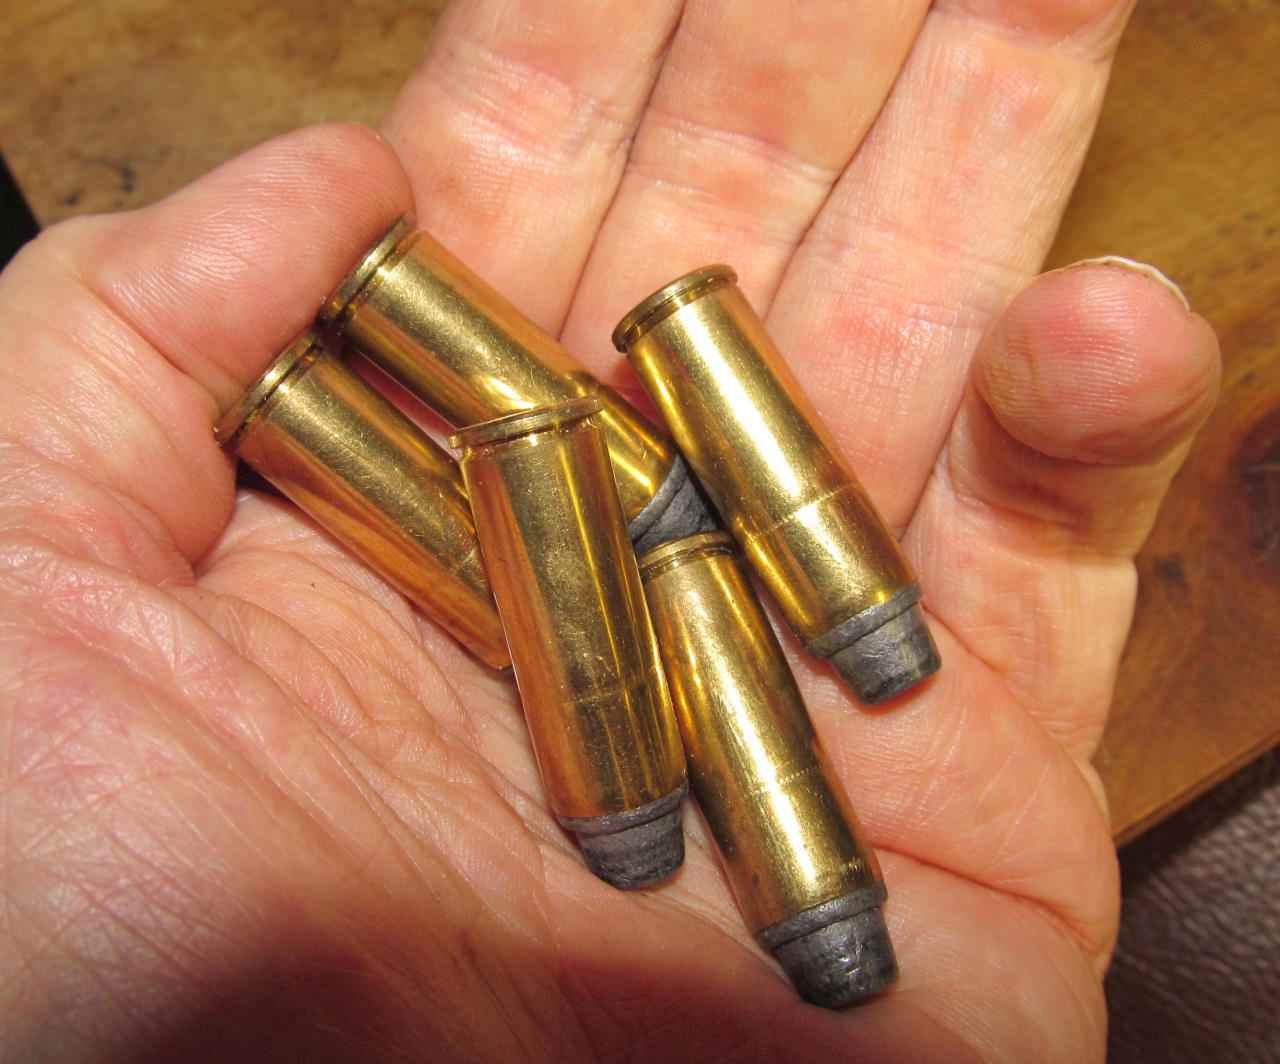
Colt 45 Ammo
Here is the ammo. Pretty large, hard to miss.
I borrowed the following two photos from Warlock Firearms.
This is a photo of the disassembled gun. The sear is backward in this photo. The way this pistol works is that when the hammer is fully cocked, the sear catches on a notch in the hammer, holding it fully cocked and pushing the trigger forward. When the trigger is pulled, the trigger moves the sear out of the way, allowing the hammer to fall and fire the round.
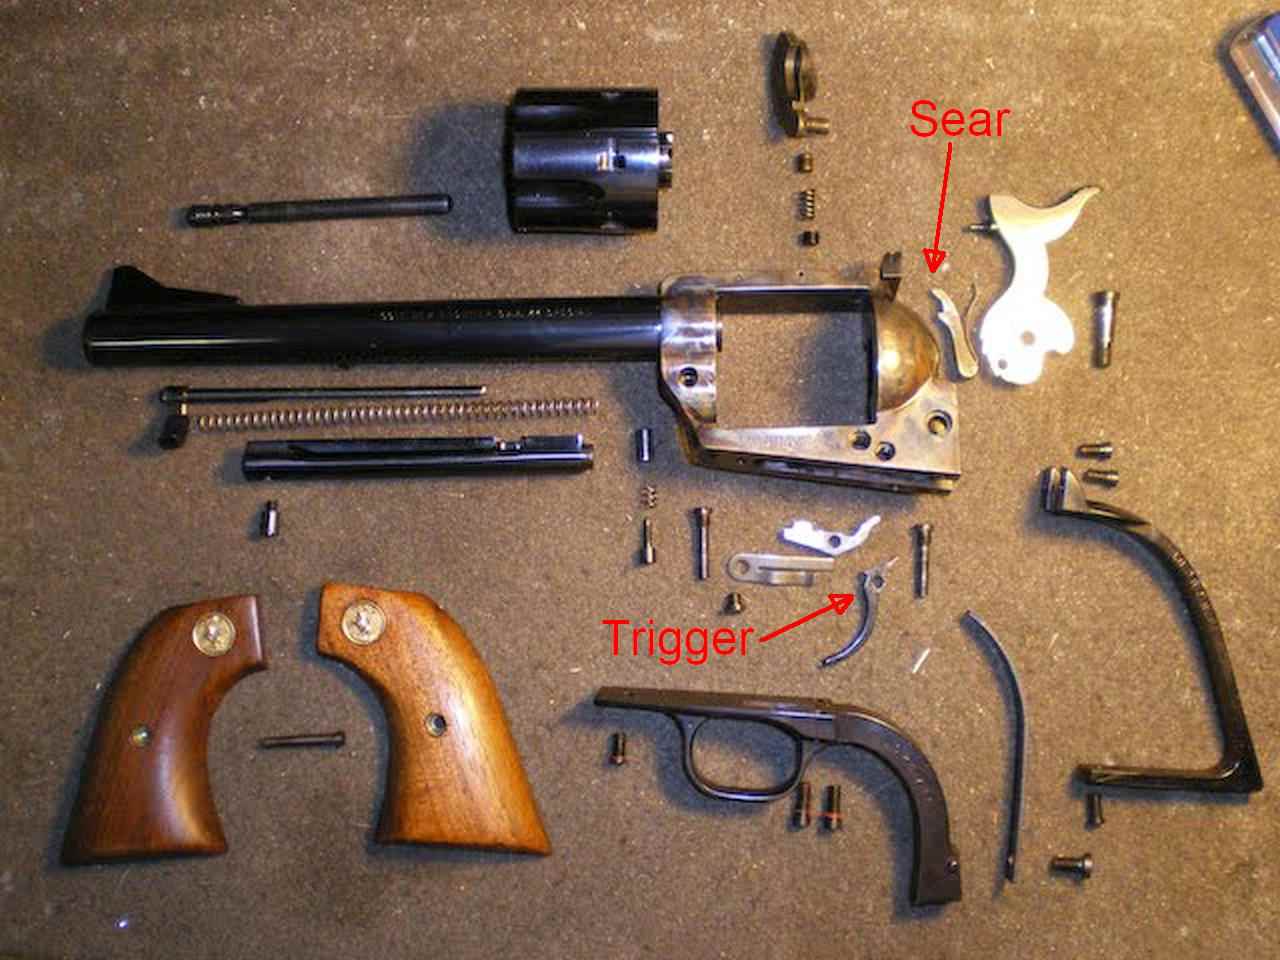
Disassembled Colt 45 SAA

Colt 45 SAA Hammer
This photo shows the detail of the hammer. This is critical to understanding why Baldwin had to not only fully cock the gun but also pull the trigger.
As the hammer is cocked, the sear first falls into the quarter-cock notch. Notice this is a notch that captures the sear. This holds the hammer back a bit so the firing pin is not contacting the cartridge primer. The trigger cannot be pulled in this position and the hammer cannot drop.
As the hammer is further cocked, the sear engages the half-cock notch. Again the sear is trapped in the notch and the trigger cannot be pulled. The hammer must be in this position to allow the cylinder to be rotated to either load the weapon or check that all chambers are empty.
As the hammer is fully cocked, the sear engages the fully cocked ledge. In this position the sear is not trapped and the weapon can be fired. As the trigger is pulled, the sear is moved to the left in this photo, releasing the hammer so it can fall with full force and fire the cartridge.
For the gun to have accidentally fired from the half-cocked position, the half-cock notch would have had to be broken off. The FBI forensic report said that the gun was in good order and the only way it could have fired was if the trigger was pulled. More specifically, the hammer had to be fully cocked and the trigger pulled.
Based on this analysis, it is my opinion that Baldwin received a loaded gun, failed to clear it, fully cocked the hammer, pointed it at the lady and pulled the trigger. That is the only way the gun could have fired.
Perhaps Baldwin decided to be a smart-ass and snap the hammer on an empty chamber to startle the lady. Only he knows what was going through his mind. What there is no doubt about is that he received a loaded gun, failed to clear it, fully cocked it, pointed it at that lady and pulled the trigger, instantly killing that lady.
The prosecutor announced that he is being charged with 4th degree involuntary manslaughter. This is the lowest possible felony charge. I believe she is under-charging him because of his celebrity status. Even so, if she sticks to her guns and uses the gun enhancement feature of the law, Baldwin could receive 7 years if convicted. In my opinion, he should have been charged with much more. First degree voluntary manslaughter at the least. But this is what we have. Let’s pray she doesn’t plea bargain.
I must say again that nothing the media is hyping matters. It doesn’t matter that the armorer wasn’t there. It doesn’t matter that the guy who handed him the gun told him that it was “cold”. The only thing that matters is that he did not check the gun to make sure it wasn’t loaded. That is all that matters.
If I see someone clear a gun and then he hands it to me, I point it in a safe direction, then clear it myself. I have to be absolutely, positively sure the gun is fully unloaded. The guy who handed me the gun could have missed a round. Too many “unloaded” guns fire when the trigger is pulled not to make triply sure the gun is unloaded. That is the least Baldwin should have done. That’s what I do and it’s what I teach my students in my gun safety classes. And that is what every safe shooter does.
I also teach my students not to ever point a gun at something they don’t intend to destroy. In filming the movie, it may be necessary to point the gun at another actor but only after both the armorer and the actor check to make sure the gun is loaded with blanks. Nothing less is acceptable.
Posted by neonjohn on January 21st, 2023 under Current Events |1 Comment »
Print This Post
:
Print This Post
Nuclear Fusion Breakthrough – yet another Government Lie
PermaLink
Today, 12/13/2022, the media is awash with reports from the National Ignition Facility (NIF) that they’ve achieved a fusion breakthrough, that they made more energy than the energy input. Politicians and scientists who know nothing about fusion are waxing eloquently about the wonderful future of nuclear fusion, a supposedly clean and unlimited source of energy.
Nothing could be further from the truth. This press release is simply more of the BIG LIE that comes from the fusion research community and particularly the NIF.
It’s taken me the better part of a day to dig out hard numbers.
Ars Technica reports that they produced 2.5 megajoules of energy from the laser input of 2.1 megajoules of energy. Here’s where the fraud starts.
The 2.1 megajoules of energy was the energy contained in the laser beams but not the energy needed to generate those laser beams. Through a lot of digging I finally found that the lasers are 8% efficient in converting the electricity from the capacitor discharge to laser light. So 2.1 /.08 = 26 megajoules of electricity was discharged into the laser. 26 megajoules is vastly more than the paltry 2.5 megajoules they claim the fusion reaction produced. This is the BIG LIE!
To put this into more familiar terms, a Joule is a watt-second so 26 megajoules is 26 megawatt-seconds. divide by 3600 to get watt-hours. 7.2E3 watt-hours. 72,000 watt-hours input electrical power from the capacitors.
2.5 megajoules is 2.5 megawatt-seconds or 694 watt-hours. 694/72,000 x 100 = 0.95% efficiency. Not exactly a net positive energy gain. A net positive energy gain would have an efficiency greater than 100%.
I haven’t accounted for the capacitor charging supply, the vacuum pumps and all the other stuff. From the NIF website, the machine consumes 200 megawatts continuously while setting up and then firing a shot. So in an hour, the machine consumes 200 megawatt-hours. So the overall line-to-fusion efficiency is 694/ 2.0E8 = 3.47E-8%.
That is the truthful efficiency, 0.0000000347% efficient and that’s only true if the setup to the shot only takes one hour. As it is, it takes most of a day to set up a shot.
With DT fusion, about 95% of the energy yield is in the form of energetic neutrons. Energetic neutrons destroy materials and make them radioactive.
I’ve built a spreadsheet where I can input the desired fusion power output and it calculates a bunch of stuff such as the number of fusions per second required, the total neutrons, the neutron flux in neutrons/cm^2 at 10cm away, assuming a point source which inertial confinement would be, and a few other things.
Running calcs for 1MW of energy results in the highest neutron flux ever to exist on earth outside an exploding thermonuclear bomb. It will render steel brittle as glass in hours. There are more neutron-resistant alloys but they only delay the nil ductility point out to days. A few days ago I got into this discussion with a “fusion expurt” on quora.com. He claimed that there are materials that are sufficiently resistant to neutrons to survive. I asked him to name one. He dropped out of sight.
The neutrons must be absorbed to be converted to useful heat. There is no known substance which can absorb that kind of flux without being destroyed. Water won’t work – neutrons decompose water molecules into hydrogen and oxygen.
I input 3500 megawatts thermal to the spreadsheet, the output of a nuclear fission reactor to drive a 1200 megawatt generator. The results are:
1.24E+21 D-T fusions to produce 3500 MW of power.
1.24E+21 neutrons produced
4.47E+24 fusions to produce 3500 megawatt-hours of energy
1.42E+22 neutron density in neutrons per square cm, 10cm away from the point source.
4.96E+14 Shots per second required at the NIF per report on 12/13/2022.
1.79E+18 Shots per hour required at the NIF per report on 12/13/2022.
400 Shots per year the NIF is capable of.
0.0456 Shots per hour the NIF is capable of.
In contrast, a pressurized water reactor at 3500 megawatts using 3.5% enriched fuel produces a neutron flux of 2.4E+13 neutrons per square cm.
The ratio of neutrons produced by fusion vs fission for the same power output is 11.4:1. This is because a single fission reaction produces vastly more energy than does a single fusion reaction.
If, by some miracle, they could do the billions of shots per hours necessary to make about 3.5 gigawatts to drive a 1200 MWe power plant, the “reactor” would generate more high level radioactive waste via neutron activation than a fission plant, especially the 4th generation molten salt reactors.
It gets worse.
Each shot damages the laser optics to the extent they must be repaired before the next shot. Per the NIF website, AFTER automated repair is implemented (not there yet), the machine can only do 400 shots a YEAR!
They are trying to do deuterium-tritium or DT fusion. This is because the NIF was built to simulate the very beginning of the DT fusion reaction in a thermonuclear bomb. The purpose is to further refine the weapon modeling software so they are closer to designing a complete weapon without actual testing.
This is a dead-end for fusion energy, as are all other approaches. The pellets of D-T can’t be scaled up because of the vastly more laser power required. The NIF is achieving its purpose of weapons research. Fusion power research was only tacked on for publicity’s sake.
Fusion research is nothing more than scientific welfare.
This is a link to my spreadsheet in case you want to play around with numbers.
Posted by neonjohn on December 13th, 2022 under Nuclear |
3 Comments »
Print This Post
:
Print This Post
I’m Back!!
PermaLink
After 4 years of neglect, the Neon John Blog is back. I’m fully retired and I have a lot to write about. Stay tuned and be sure to subscribe to receive notification of a new article.
Posted by neonjohn on October 28th, 2022 under Misc |Comment now »