- Announcements
- BBQ and Food
- Cars
- Computing
- Cool Stuff
- Current Events
- Electric Vehicles
- Electronics
- Energy
- Flashahaulism
- Funny
- Government
- Hints and Tips
- History
- HVAC
- Induction heating
- Internet
- Lighting
- Misc
- Neon and other lighting
- Nuclear
- Personal
- Pets
- Philosophy
- Photography
- Power Generation
- Product Reviews
- Projects
- Q and A
- RV/Camping
- Science
- Tellico
Categories
Blogroll
 Print This Post
The Linux Chronicles – Virtual Machines
PermaLink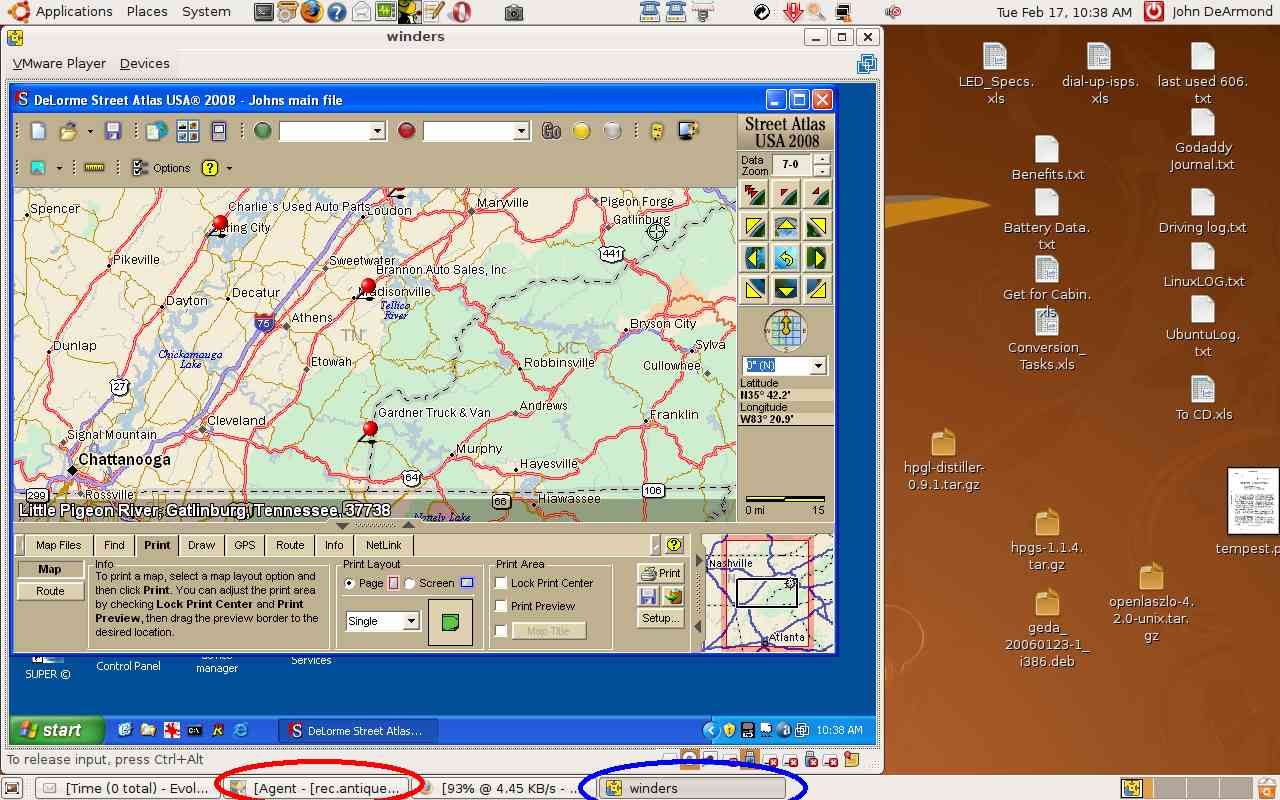
Imagine being able to run Linux programs and Windows at the same time on the same machine. No, I’m not talking about Wine, the Windows emulator. I’m talking about running genuine Windows XP as an application under Ubuntu.
Well, Imagine no more. If you look at the screen capture to the left you’ll see the Ubuntu desktop. You’ll see a window with XP running in it and Street Atlas running under XP. You’ll see the XP window, called “winders” on the Ubuntu task bar circled in Blue. At the same time, Forte Agent mail agent is running under Wine, its tab being circled in Red.
Amazing, no? All that is brought to you by the power of VmWare. (that web page is horrible so unless you just like to waste bandwidth, don’t bother.) VMware is an executive that runs under a host system (Ubuntu in this case) and creates 1 or more virtual machines (VMware calls them appliances) that other operating systems can run under. One could have multiple copies of windows, windows and a different distro of Linux or even multiple copies of Ubuntu running under Ubuntu. Dizzying, isn’t it?
A virtual machine gets its own memory and disk drive space and all the other resources an OS normally expects. The XP that is running in the above screen capture was installed from the XP disk that came with my computer. In other words, it’s the real thing and not an emulation.
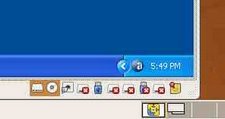
This is a blow-up of the lower right corner of the VMware window, the window that contains XP. Each of the little icons is a resource. A disk drive, a CD drive, a scanner and so on. Each resource can be turned off or on at will. If I turn on a disk drive, windows responds with a “found new hardware” bubble and installs that hardware. IOW, it doesn’t know the difference between a real and a virtual resource.
Another exciting feature is the ability to drag and drop things between the XP window and Ubuntu. In fact, that’s how these photos were brought to this post. I write my blog entries using a program called BlogDesk. It is a windows program that will not run under Wine. It runs just fine in a virtual machine running XP. I did the screen captures using Ubuntu’s screen capture utility and the dragged the images from the Ubuntu desktop to the XP desktop. Slick.
VMware
Vmware is in the business of selling very high dollar products to big corporations but they have a few things for us little guys and most are free. If you follow this guide, you can set up a virtual machine for free.
There are several concepts that are critical to understanding how this works:
- Appliance – An appliance is a virtual machine. Physically, it consists of a minimum of two files – a file containing the disk drive for the virtual machine and a configuration file. When the configuration file is “run”, the virtual machine is started up. The operating system and all data files are contained in that one native machine “disk drive” file. Appliances can be built or they can be downloaded pre-built from the Appliance Store. For our purposes, the store isn’t of much use because pre-built Windows machines can’t be distributed. M$ wouldn’t like that.
- Appliance Marketplace – this is a place on the VMware website where pre-built appliances can be downloaded. Contrary to the name, these downloads are free. Most all of these are Linux-oriented and thus of little use to us since we want a windows virtual machine appliance.
- Server. The Server The server is a free product designed to allow one to built multiple servers on one hardware. We don’t need to do that. What Server DOES do that we need is that it can build an XP appliance for us. It’s a huge download (almost a gigabyte) but necessary.
- Player Player is a (in our case) Linux application that actually runs the VM appliance. It is also free. What you see in the screen shots above is Player running the XP virtual machine Appliance.
- Appliance Builder This is the software and process of building an appliance. That is, creating a virtual machine and loading it with an operating system, in our case XP. Server is one builder. Another is this. I haven’t tried this but it is reported to work well.
- VMware Tools. This is a suite of tools that is installed on the virtual machine that enables several important functions such as drag and drop. Tools are installed after the VM is created and the OS installed. if you build your windows appliance using Server then you’ll have the opportunity to install the tools as part of the process. If you use the appliance builder website mentioned above, then you’ll want to read this.
Things to Download
To get started, you’ll need to download some things. We’re going to create a VM using Server so you’ll need the following:
- Server. You have to register and get an activation key so I can’t provide a link here. This is a huge download, several hundred megabytes.
- Player. A slightly smaller download but still large.
- Server Installation Guide
- Appliance Installation Guide.
I recommend dropping these on the Ubuntu desktop.
Installing Server
Server has to be installed from a command prompt because it has to be installed with root priviledges. Open a terminal window and do the following.
$ cd ~/Desktop
$ tar -xzf VMware-server-2.0.0-122956.i386.tar.gz
This leaves a directory named vmware-server-distrib on your desktop. Execute the following:
$ cd ~/Desktop/vmware-server-distrib
$ sudo ./vmware-install.pl
This starts the install. You will be asked a series of questions. The default answer works for each question – just hit <enter>. When it asks about networking, choose both “bridged” and “NAT”.
When the install finishes, you can delete the above installation files.
The server is controlled through a web interface. To connect to the server, go to your web browser and type the following:
http://localhost:8800
http://localhost:8222 (sorry ’bout that)
Port 8222 assumes you chose the default option during the install.
Open the installation manual and go to the chapter on installing a virtual machine on Linux. Follow those step-by-step instructions to create a virtual machine appliance.
At some point you’ll be asked to put your windows distribution disk in a CD drive. This must be a bootable CD drive because the windows distribution disk will be booted into the virtual machine and the installation commenced.
When the procedure asks for a virtual drive size, choose a large one, say, 20 gigabytes. This does not occupy 20 gigabytes on your hard drive. That simply sets the largest size permissible in this VM. The size can be changed later but it’s a pain, involving a partition manager and stuff. The virtual drive file grows as data is placed in it. It can also be shrunk using the VMware tools.
After the windows install is finished, launch the virtual machine by “turning it on”. Windows will boot in a new window and do all the preliminary stuff that a new install does. Choose the option from the web interface to install the VMware tools. These tools are vital and must be installed from the web interface. Once all of that is done, shut down the windows VM (just like you would a regular windows machine) and exit the browser interface. We are now finished with Server.
Server will let you run a VM but it will not allow you to access most of your machine’s hardware resources. Therefore after we used Server to build the virtual machine, we will install and use Player to actually run it. Player allows almost no changes to be made to the virtual machine but it does enable all the resources.
To install player, assuming that the terminal is still open and that the player file is on the desktop, do the following:
$ cd ~/Desktop
$ sudo ./VMware-Player-2.5.1-126130.i386.bundle
Let this installation run its course. In the process it de-installs Server. When it finishes, a command called “vmplayer is installed in /usr/bin. This is the player.
The windows VM is installed in
/var/lib/vmware/Virtual Machines/<windows VM name>
I called my windows VM “winders” so my machine is located in
/var/lib/vmware/Virtual Machines/winders
The actual machine is
/var/lib/vmware/Virtual Machines/winders/winders.vmx
The virtual machine was installed by server owned by root. The machine has to be owned by your account for Player to run it so do the following, substituting your userid and VM name.
$ cd “/var/lib/vmware/Virtual Machines/winders”
$ sudo chown jgd *
Substitute your userid for “jgd” and your VM name for “winders”. Be sure to use the quotes as indicated because of the space in the directory name.
To start a windows session I would type
$ vmplayer “/var/lib/vmware/Virtual Machines/winders/winders.vmx”
The quote is necessary because of the space in the Virtual Machines directory name. Now this is a lot of typing so what I did was create a desktop icon containing the above command. To do that, right-click somewhere on your Gnome desktop and select “create new launcher”. Give it a name and put the above command (substituting your VM name, of course) in the “command” slot. Close the window and a new icon will appear on your desktop. That’s all there is to it.
Wrap Up
You’ve now finished installing the VM. You can launch windows by double clicking on the icon you just created. There are a few things that you need to know that the manual doesn’t explain.
Any resource allocated to the VM (by enabling it using the lower right icons or the menu at the top left) is not available to the Linux system. Thus, if you allocate your printer to the VM, you cannot print in Ubuntu until you either un-allocate the printer or shut down the VM. As shown in the second screen capture above, I leave everything unallocated until I need it.
When you allocate a resource for the first time, windows discovers it as new hardware and runs the plug’nplay for that device. If the device needs a supplied driver on disk (my scanner and laser printer, for example), have the disk ready and placed in the CD drive. The CD drive must be allocated, of course.
When you are ready to de-allocate a disk drive you must first safely remove it from windows using the icon on the tray. This is just like on a windows machine. If you don’t “safely remove” the drive, when you un-allocate it, it will be left “dirty” and will not mount on your Linux system until you use windows to fdisk it. As far as windows knows, it is running natively on actual hardware so you have to do everything just like you did when windows was installed on your machine.
Closing the windows window puts windows into hibernate mode. When you click the desktop icon again, windows resumes where it left off. This is a good thing except that you must not shut down Linux with windows hibernating. If you do, windows will start in an unknown state and will probably BSOD.
When windows BSODs (it does that as a virtual machine just like it does on a real one), do not just close the blue screen window. That will hibernate the BSOD. When you restart windows using the icon, it will go through the process of starting up, only to BSOD again. Instead of closing the window, use the Player dropdown menu at the upper left to “shutdown and exit”. This is like flipping the power switch on a real machine and allows windows to start from scratch on the next startup.
That’s about it. You can now install your windows applications just as you would on a real machine. The VM runs windows about 2/3 normal speed as compared to native windows. That’s acceptable to me. Especially since I don’t run windows all that much. I try to do everything I can in Linux native mode, saving the windows VM for only those apps that won’t run under Wine and for which I’ve found no Linux substitution.
Enjoy
Posted by neonjohn on February 17th, 2009 under Computing
February 18th, 2009 at 7:29 pm
There are a bunch of nice things about running stuff on a virtual machine instead of a real one. Got new hardware and don’t want to re-install all your applications? No problem, because you just move the virtual machine image over to the new box. Can’t get drivers for Windows 2000 to support the hardware of your new box? No problem, it doesn’t need them if you run it inside a virtual machine. Got a software vendor who won’t support their tiny application unless it’s on a “dedicated server”? No problem, give it its own VM and they’ll never know the difference. There is serious talk in the industry about running everything on a virtual machine in future, for a whole bunch of reasons like these.
The one issue we’ve experience with the “virtual hard drives only take up space on the physical hard drive when you write to them” trick is it’s kind of easy to run out of space on the real physical drive while the virtual drive still shows it has plenty left. Not too hard to watch for that when you’re in charge of both, but when you have groups of people who only have access to the virtual server over the network, it can get exciting. ;) I don’t know what VMware does in that case, but one of the other virtual server products we use just ‘pauses’ the affected virtual machine in that case. It’s either that or generate some kind of disk error to pass back to the operating system, I guess.
February 28th, 2009 at 7:20 pm
At John’s request, I’m adding some comments with my experience installing to Ubuntu Intrepid.
I am a novice. So it was challenging to me to get some things working. First thing I’ll put in here, If you are a little leery of working with tar.gz then you can use alien and convert .rpm to .deb and use the package manager to install. Package uses root by default to install.
Use the Package Manager to install alien or;
$ sudo apt-get install alien
$ cd ~/Desktop
$ sudo alien VMware-Player-2.5.1-126130.i386.rpm
or the Server .rpm as appropriate. Then double click the .deb to install.
Several things I did. By default, Ubuntu sets your processor speed at
Powersave, if it’s scalable. On the top task panel, right click and add to panel the CPU monitor. Then click on it and set your CPU speed
to OnDemand at the least, Performance if you want. There may be
another way to do this, but I haven’t found it yet, I’m sure there is.
Next, I allowed the VM to have both processors. Set the memory at 1024 and turned it loose. Installed in less than an hour. Also, set the memory allocation to 1024, or less than your installed memory. Don’t use the max setting. On my box, it was more than I have installed and it screwed up the install at least twice.
I had a problem here, $ sudo chown jgd *. The log hasn’t been created yet and after the player installs it bitches about the log permissions not being correct.
I also had some problems with hibernating the first time. It couldn’t create and write to the snapshot file. So I just went back and did
$ cd “/var/lib/vmware/Virtual Machinesâ€Â
$ sudo chown frank /Windows
Don’t get cutesy and go back in Nautilus and use properties/permissions to give root read and write privileges. Player can’t get exclusive lock on the files to run. (I know, I’m a nubey and didn’t know that.)
But I am thankful to John for posting this. I’ve been highly dissatisfied with the Wine solution. It won’t run most new iterations of Windows software.
March 13th, 2009 at 8:43 am
Hi John,
Another VM choice is VirtualBox, the open source virtualization environment recently acquired by Sun. Still completely free (speech and beer) and runs beautifully on my Mac.