- Announcements
- BBQ and Food
- Cars
- Computing
- Cool Stuff
- Current Events
- Electric Vehicles
- Electronics
- Energy
- Flashahaulism
- Funny
- Government
- Hints and Tips
- History
- HVAC
- Induction heating
- Internet
- Lighting
- Misc
- Neon and other lighting
- Nuclear
- Personal
- Pets
- Philosophy
- Photography
- Power Generation
- Product Reviews
- Projects
- Q and A
- RV/Camping
- Science
- Tellico
Categories
Blogroll
 Print This Post
The Linux Chronicles – Making Backups
PermaLinkThis post is about backing up. More specifically, backing up in a way that is usable. That is, that precludes your having to do a full re-install if something happens to your disk.
In the linux world there are two kinds of backups:
- File oriented
- Partition oriented
File oriented backup simply means that you copy all your files from one place to another, “another” being another hard drive, a network drive or some other type of storage like DVDs. Partition-oriented backup means that you back up the whole partition. This gets the OS, all the files and everything else. This is similar to drive cloning in Windows
Critical to either backup method (unless you like swapping a LOT of DVDs) is a large external hard drive. By large I mean at least 400 gig. External USB interface hard drives are everywhere these days and are dirt-cheap. I got my 400 and 500 gig drives from Sam’s Club. They seem to always have the cheapest price at the moment when shipping is figured into alternatives.
Equally critical to success is to have a backup plan. A plan is not “I’ll backup whenever I think of it”. A plan is a method and automation to do it on a regular and fail-safe basis. A good plan might be “do a partition backup once a week and daily incremental file backups.”. In fact, that is my plan.
A root partition backup can’t be automated because the partition must be unmounted which isn’t possible for the partition that was booted. Therefore I have my Palm Pilot set to remind me to do a backup every Sunday evening. Daily incremental backups are automated.
Daily Backups
The solution for daily backups is simple – “Backup-manager”. This program is in the repository. Simply start the Synaptics partition manager from the desktop and search for “backup-manager”. Check it to be installed and let it download and install.
There is a tiny bit of setup to be done. There is a file called /etc/backup-manager.conf that must be edited. This might seem daunting but it isn’t. Simply open a terminal window from the desktop and execute the following:
$ sudo vi /etc/backup-manager.conf
if you’re comfortable with vi or
$ sudo gedit /etc/backup-manager.conf
if you’re more comfortable with a windowed editor.
The first thing to change is the destination. This will be your external hard drive. When the hard drive is plugged into a USB port, it automatically mounts in /media using the volume name that it is given. I changed my drives’ volume names to something more descriptive than “segate xiys-4958773” or something similar. Descriptive names like “400 gig” and “500gig”. Therefore my 400 gig drive mounts as /media/400gig.
On that drive I have a directory for backups called “Linux_Backup”. So the destination for backups is “/media/400gig/Linux_Backups“. Remember that case matters in Linux so get your capitalization correct.
Back to the config file. At the top of the file you’ll see something like this:
##############################################################
# Repository - everything about where archives are
#############################################################
# Where to store the archives
export BM_REPOSITORY_ROOT="/media/400gig/Linux_Backup"
Simply edit the text inside the quotes to match your destination.
Got it? Good. We’re a third of the way done. Next, go down to where you see this:
# The backup method to use.
# Available methods are:
# - tarball
# - tarball-incremental
# - mysql
# - svn
# - pipe
# - none
# If you don't want to use any backup method (you don't want to
# build archives) then choose "none"
export BM_ARCHIVE_METHOD="tarball-incremental"
Simply edit BM_ARCHIVE_METHOD to be exactly as shown. What this means is that on the designated day of the week (Monday by default), a full backup will be made. On other days, only those files that changed will be backed up. That’s called an incremental backup.
Finally we specify what to back up. Find this section in the config file
# It's recommanded to use BM_TARBALL_TARGETS[] though.
# Warning! You *must not* use both variables at the same time.
# NOTE: The Debian package will only update BM_TARBALL_DIRECTORIES
# Paths without spaces in their name:
export BM_TARBALL_DIRECTORIES="/etc /home /usr /var /lib"
I strongly recommend backing up all the directories listed above. Just copy that line directly into your config file.
That all there is. Save the file and sit back and relax. Sometime during the day every day this program will run and will back up your stuff. The default is to keep 5 generations of backups. That’s why you need a large drive. You can edit the config file to change that number if you like.
See, that wasn’t difficult at all.
Partition Backups
Partition Backups are no more difficult but they are more involved. That is, more steps are involved. We’re going to use the program partimage that I’ve discussed before. IF you don’t already have it then fire off Synaptics Package Manager and get it. Just search for “partimage” and install it.
Partimage usually resides in “/usr/sbin/partimage”. For this task we need it to reside on the backup drive. Therefore we’ll copy it over. In these examples my backup drive is named “400gig”. Substitute the name of your drive.
Open a terminal from the desktop and type the following:
$ cd /mount/400gig
$ sudo cp /usr/sbin/partimage .
That copies partimage into the root of the 400 gig drive.
Partimage can’t work on a partition that is mounted and subject to change at any time and yet we want to back up the root partition that contains everything in a default Ubuntu installation. The solution is to boot from the Live CD. That’s what we’re going to do.
Put the live CD in your CD or DVD drive, click in the red power symbol at the top right of your desktop and choose “restart”. Your system will shut down and will reboot into the live CD. Answer “English” (or your native tongue) and then choose “Try Ubuntu without changing your system” or something to that effect. It is the default option.
When the boot is finished and you have a desktop, open a terminal window and type the following:
$ cd /media/400gig
$ sudo ./partimage
You should see a screen similar to this:
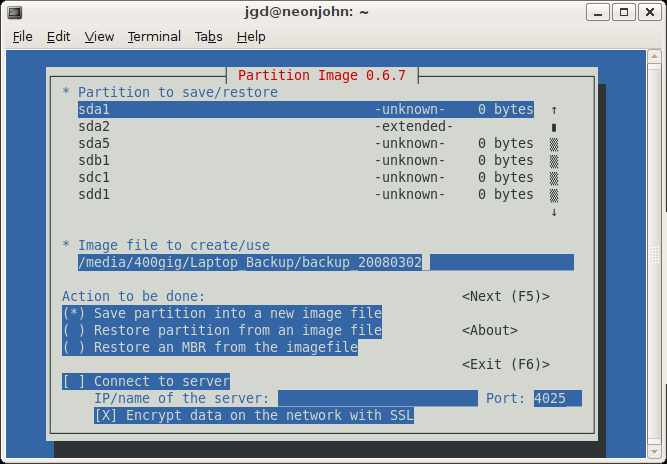
To move from field to field use the <tab> key. Use the <space> bar to make or unmake a selection. Notice where I filled in my destination file name. When you have your screen matching this, press <F5> to go to the next screen:
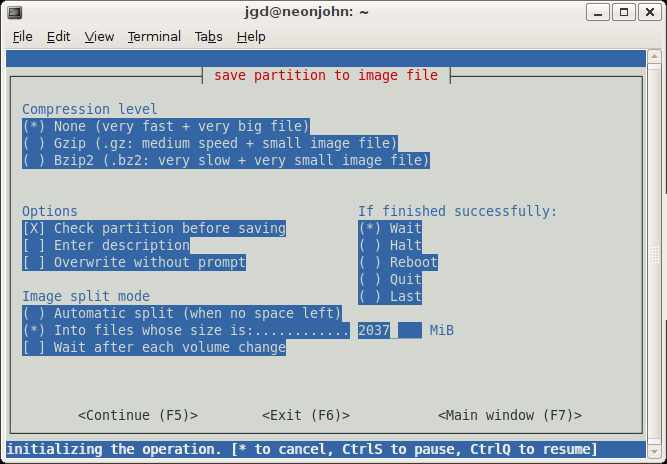
The important parts are:
- no compression. Unless you have a VERY fast processor, use no compresion. This program is capable of transferring data at the speed of the drives (over a gigabyte a minute). Compression greatly slows things down. It takes about 30 minutes to back up 50 gigabytes of data from my hard drive. That stretches out to hours with compression. We have a large backup drive so let’s use it.
- Check Partition Before Saving. This is very important and only adds about 5 minutes to the job. An unhealthy partition might not restore.
- …into files whose size is. This causes partimage to create a new file every 2 gig or so. This is very important when backing up to a windows formatted (NTFS) drive, as all USB drives come from the factory. NTFS gets very slow as a file grows past 2 gig. Probably a legacy from FAT32 days. Anyway, make sure this option is selected.
When you’re ready to start, press <F5>. Then go kill a half hour or so. When the backup is finished, reboot to your regular system and you’re done.
Restoration involves the same process except that you choose “restore a partition from an image file” on the first screen. The major benefit of this backup method is that it takes a snapshot of the system as it existed. A restoration puts it back exactly like it was when the snapshot was taken. No re-installing the system from the Live CD and copying files. No muss, no fuss. Just reboot and you’re up and running again.
Summary
To summarize, I use partimage to back up my root partition about once a week. Every day my machine is backed up automatically by backup-manager. Simple and clean. And reliable.
If you’ve ever done a backup under windows, you’ll really appreciate how much easier this is. Oh so typical for Linux. You’ll also notice that you didn’t have to spend any money on a backup program that uses a proprietary format and might not work when you need it to restore. I’ve been bitten by that one more than once. Partimage is open source and free and always will be. It will always work. Again, that’s the Linux way.
Posted by neonjohn on March 2nd, 2009 under Computing
March 3rd, 2009 at 12:38 pm
Are you protected against backing up directories that have been corrupted by a virus, accidental file deletion, or other problem that isn’t detected before the backup? I like to keep permanent backup CDs/DVDs so that I can “go back in time” if necessary. It is also nice to have a duplicate backup off-site in case of fire/flood/etc.
May 11th, 2010 at 4:48 pm
Hi John,
I tried to email you but when I copied it into the email program it showed javascript:jgd_email(‘jgd’). I saw an ad from Harbor Freight Tools for a portable torch kit with oxygen and acethylene tanks – empty and thought it would be good to learn to weld with. And then I was trying to learn how I could get the cylinders filled and that is how I came upon your post http://yarchive.net/car/rv/acetylene.html It was very helpful in my efforts at learning how the acethylene tank is filled. I read your explosion experiment and am now unsure about how I would get the tank filled with owning the tank myself and then storing it here in my garage. I’ve decided to learn more, much more before making the final purchase at Harbor Freight. I also appreciated reading your site. Thank you. Patricia