- Announcements
- BBQ and Food
- Cars
- Computing
- Cool Stuff
- Current Events
- Electric Vehicles
- Electronics
- Energy
- Flashahaulism
- Funny
- Government
- Hints and Tips
- History
- HVAC
- Induction heating
- Internet
- Lighting
- Misc
- Neon and other lighting
- Nuclear
- Personal
- Pets
- Philosophy
- Photography
- Power Generation
- Product Reviews
- Projects
- Q and A
- RV/Camping
- Science
- Tellico
Categories
Blogroll
 Print This Post
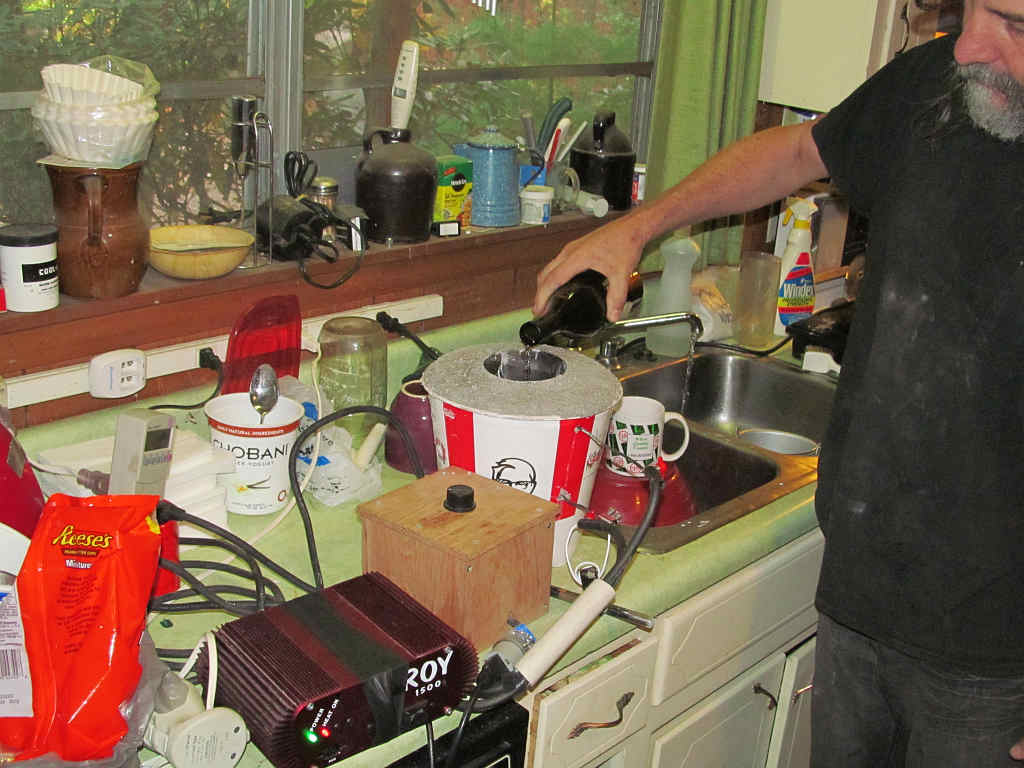
Using the Induction Heater – Aluminum Casting
PermaLinkA major use for induction heating in industry is metal melting. Since I have an interest in metal casting, I decided to build a furnace suitable for melting small batches of aluminium for sand casting. I also wanted to see how well our Fluxeon Roy product, especially our soon-to-be-introduced 2500 watt unit would work at this task.
The first step was to build a small prototype furnace capable of melting 5 or 6 pounds at a time.
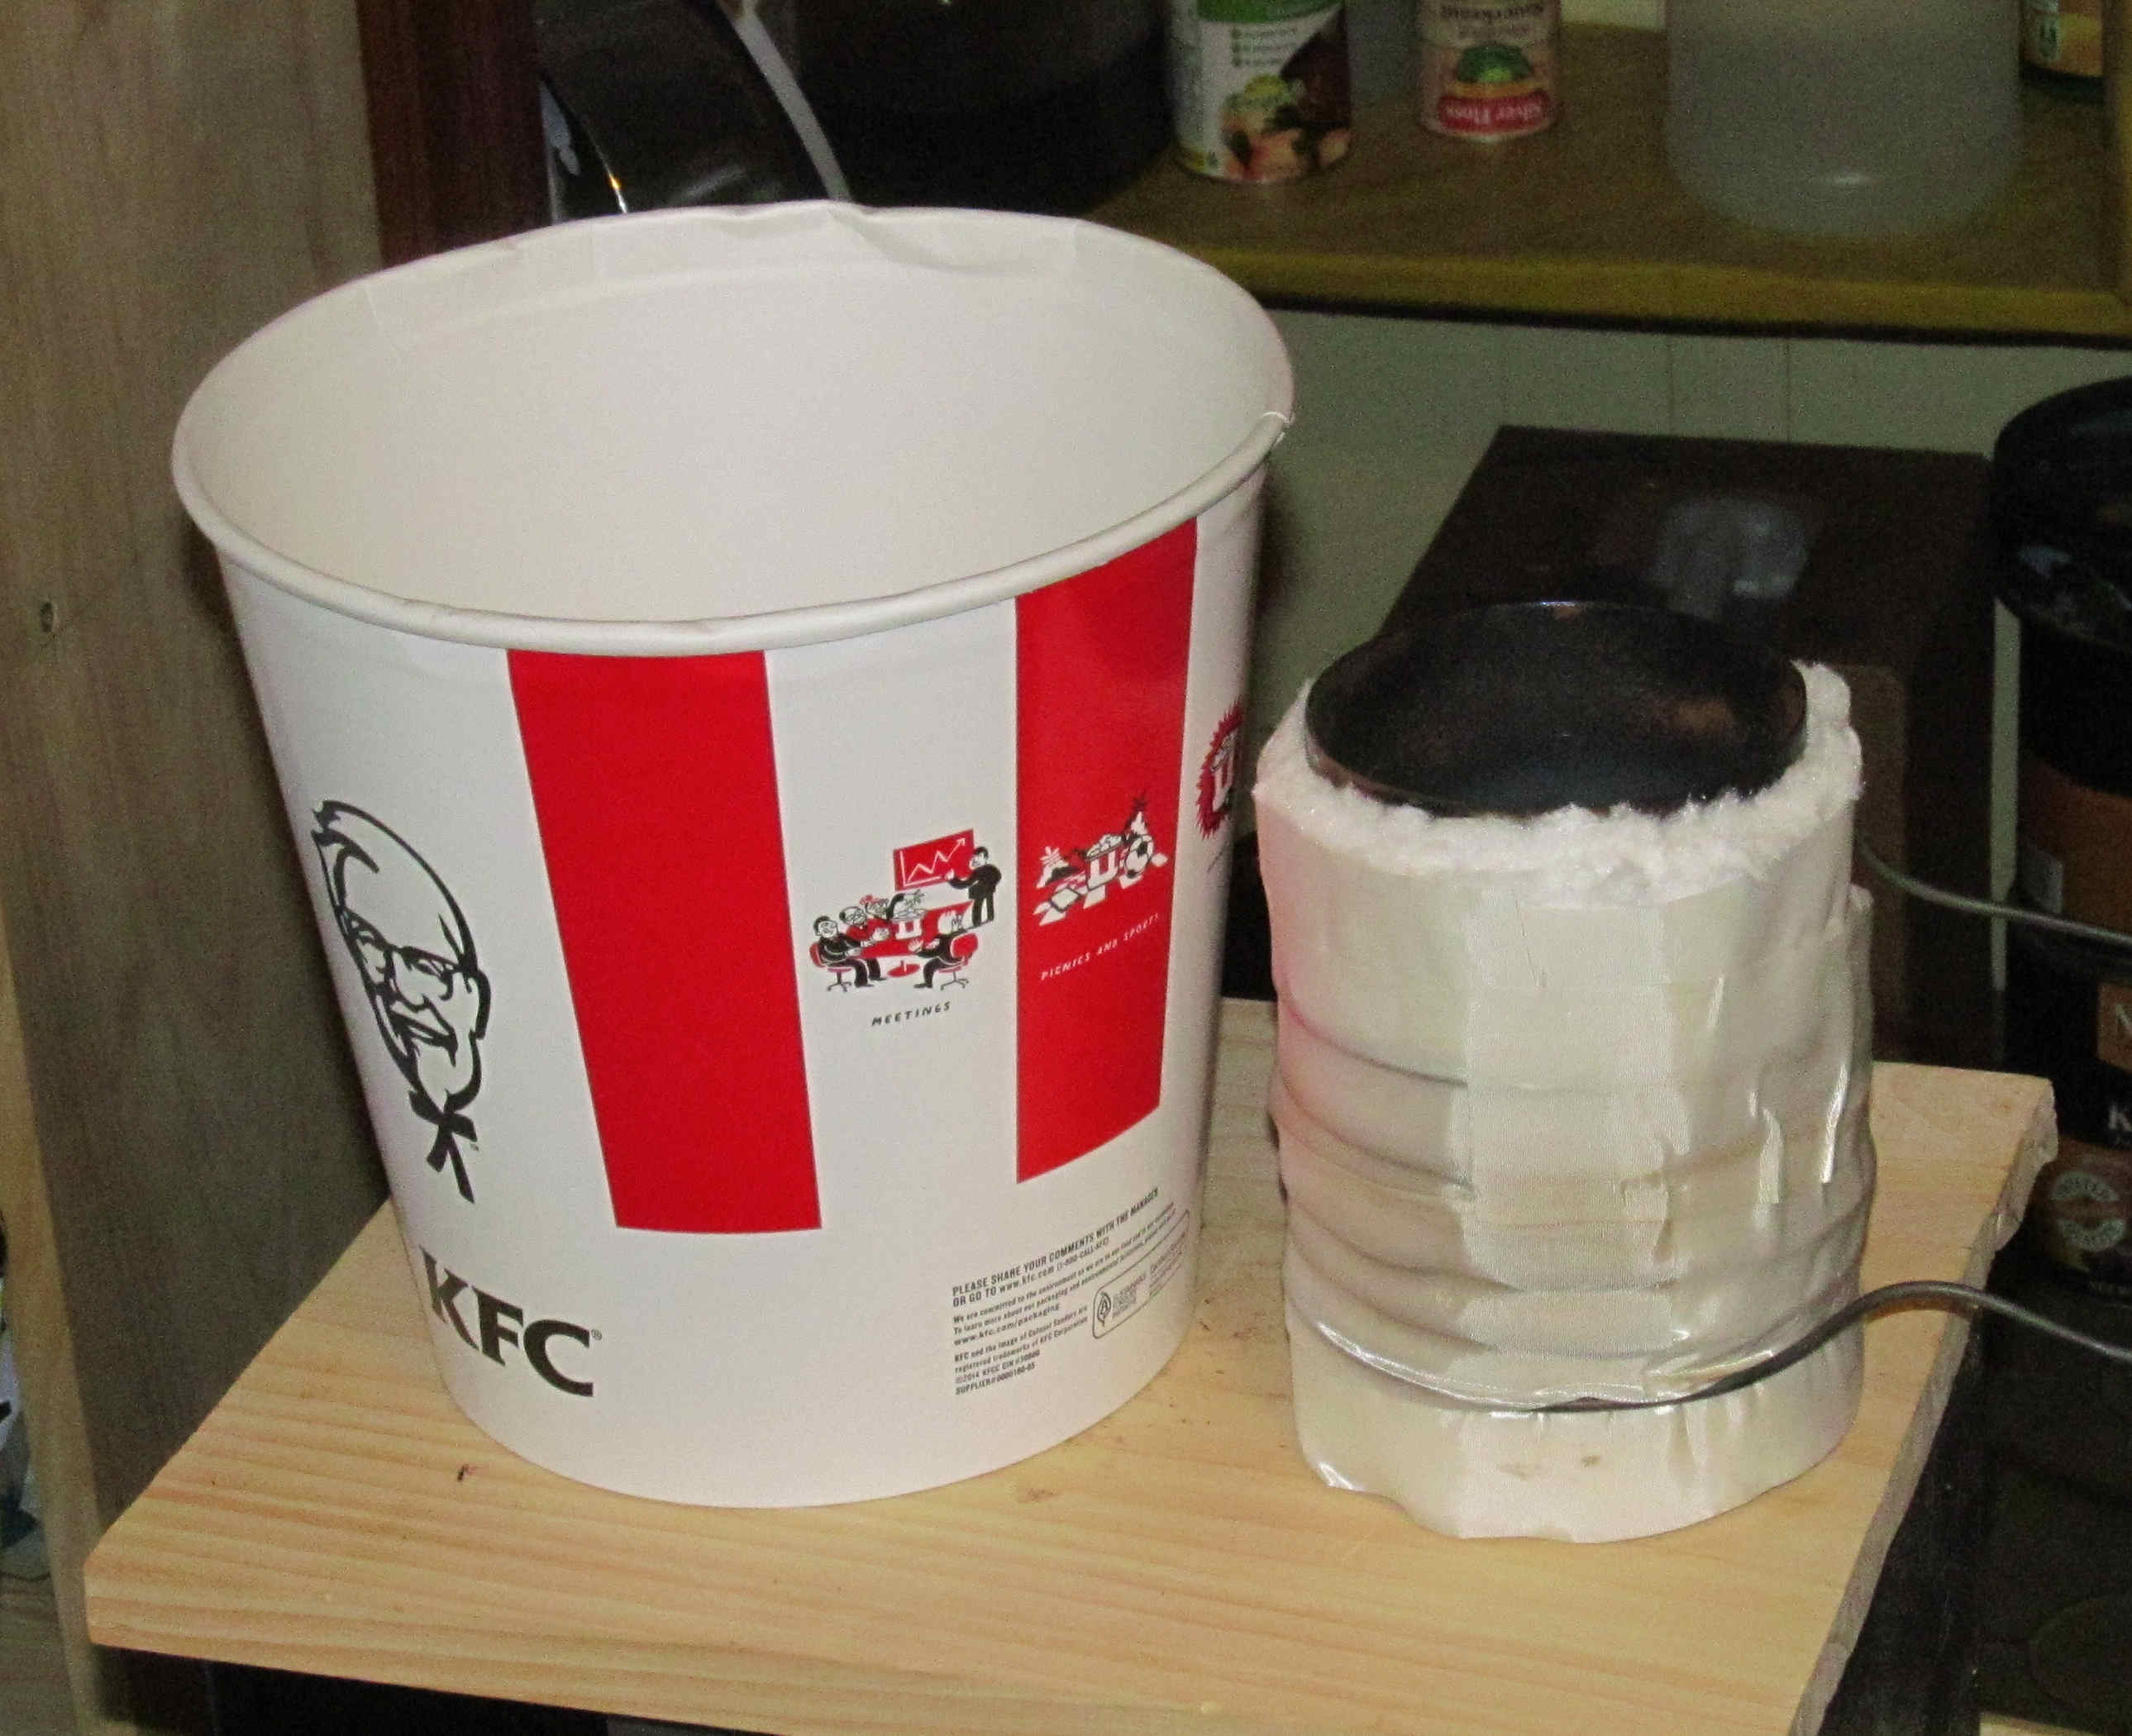
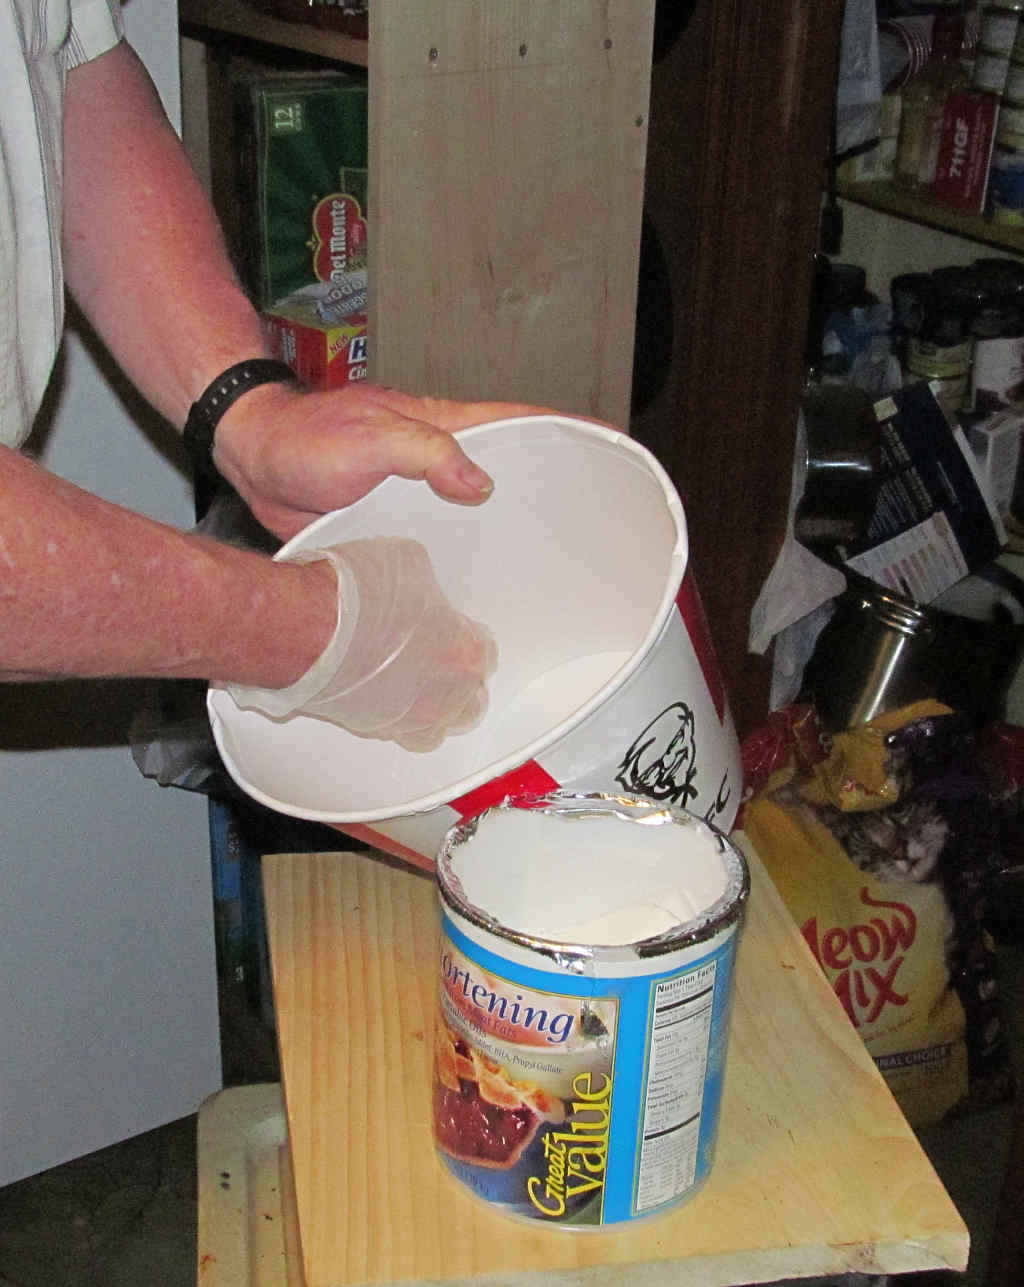
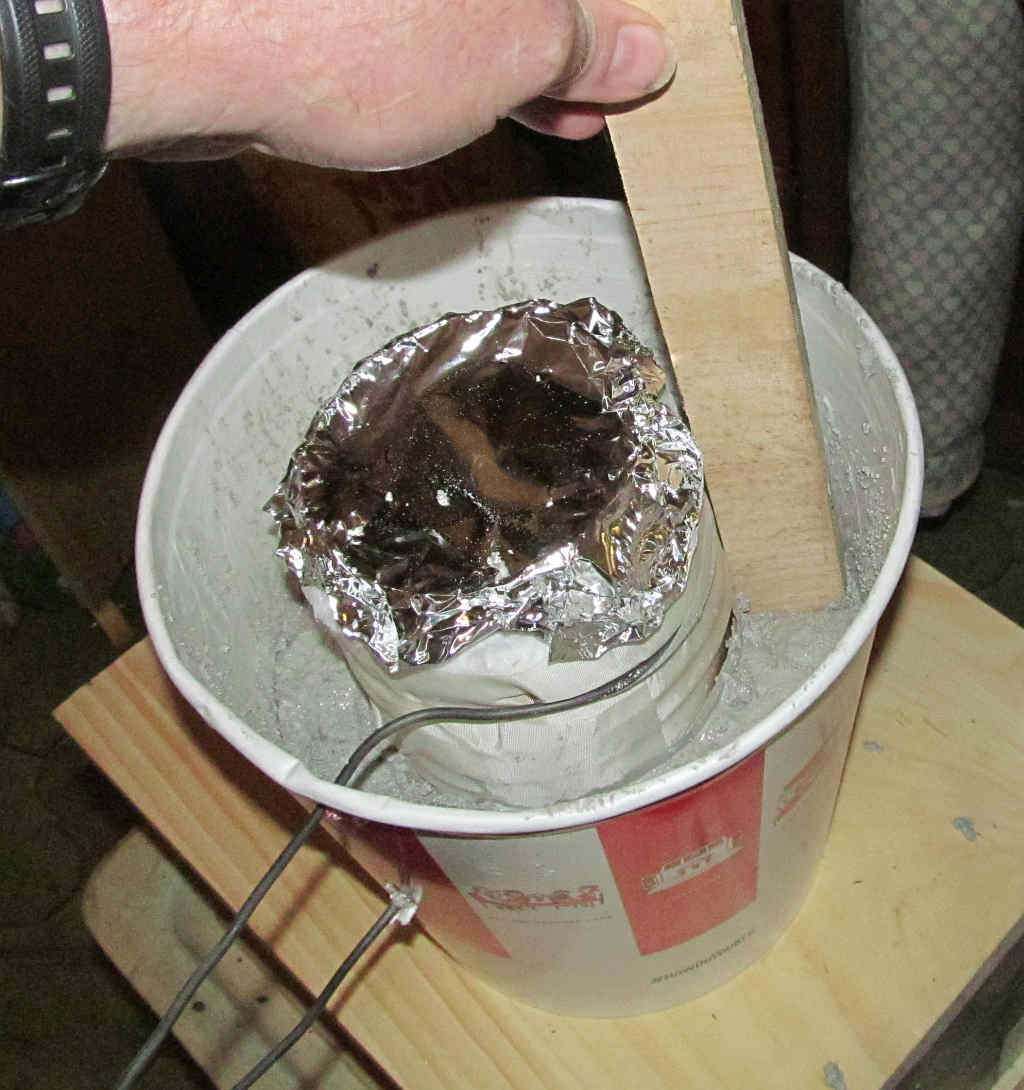
The main ingredients
The main ingredients for this small furnace are shown here. The crucible is a squat propane gas bottle with its head cut off. The outer container is, of course, a KFC bucket, the large version (special thanks to the Athens, TN KFC for donating the bucket)
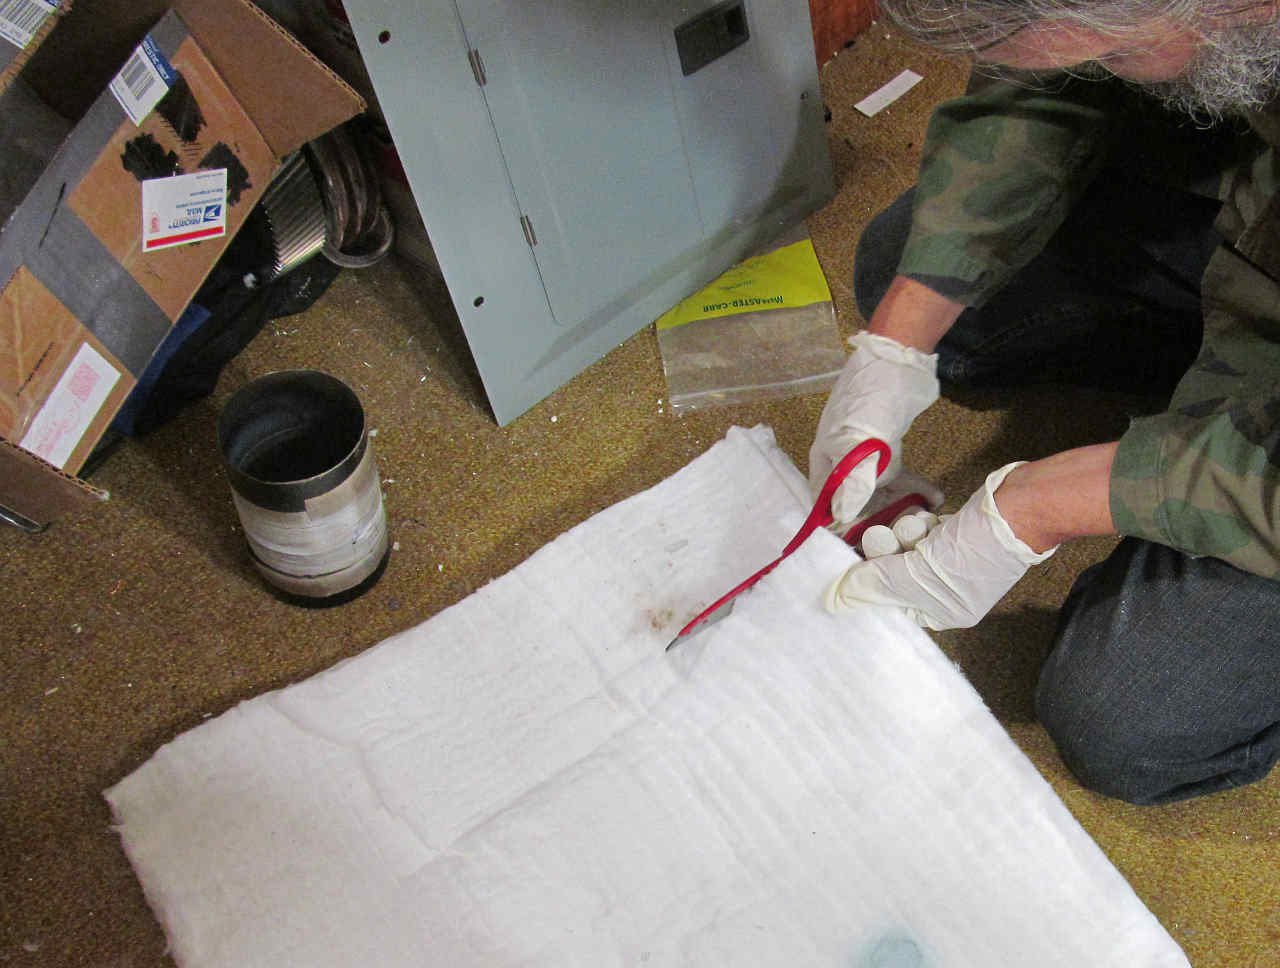
Cutting the Frax. Notice the gloves!
The cylinder is wrapped in FiberFrax spun alumina matting to electrically insulate the induction coil from the steel crucible.
Here my friend Matt is cutting from a blanket of Frax. Note the gloves! Frax is even more itchy than fiberglass!

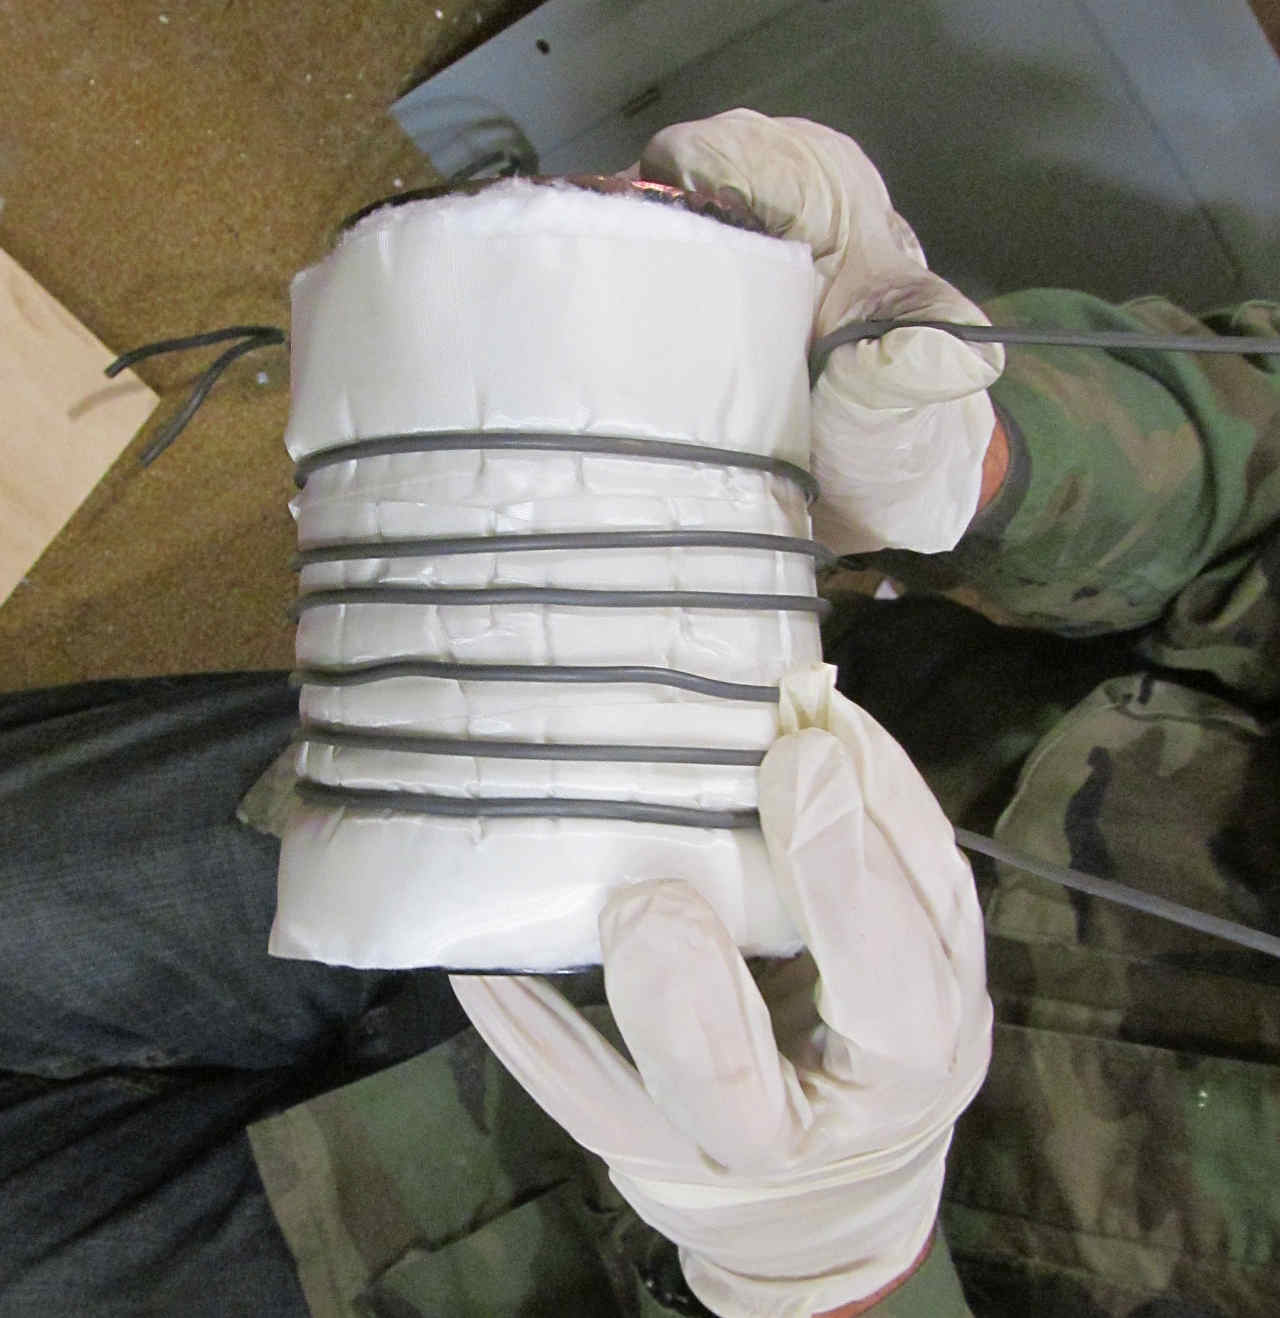
Wrapped with fiberglass tape to hold the Frax in place.
The Frax is covered with fiberglass tape to hold it tight. This tape will burn off during the first heat but it is necessary during assembly. Other tape such as masking tape could probably be used but it would smoke and stink during the burn-out.
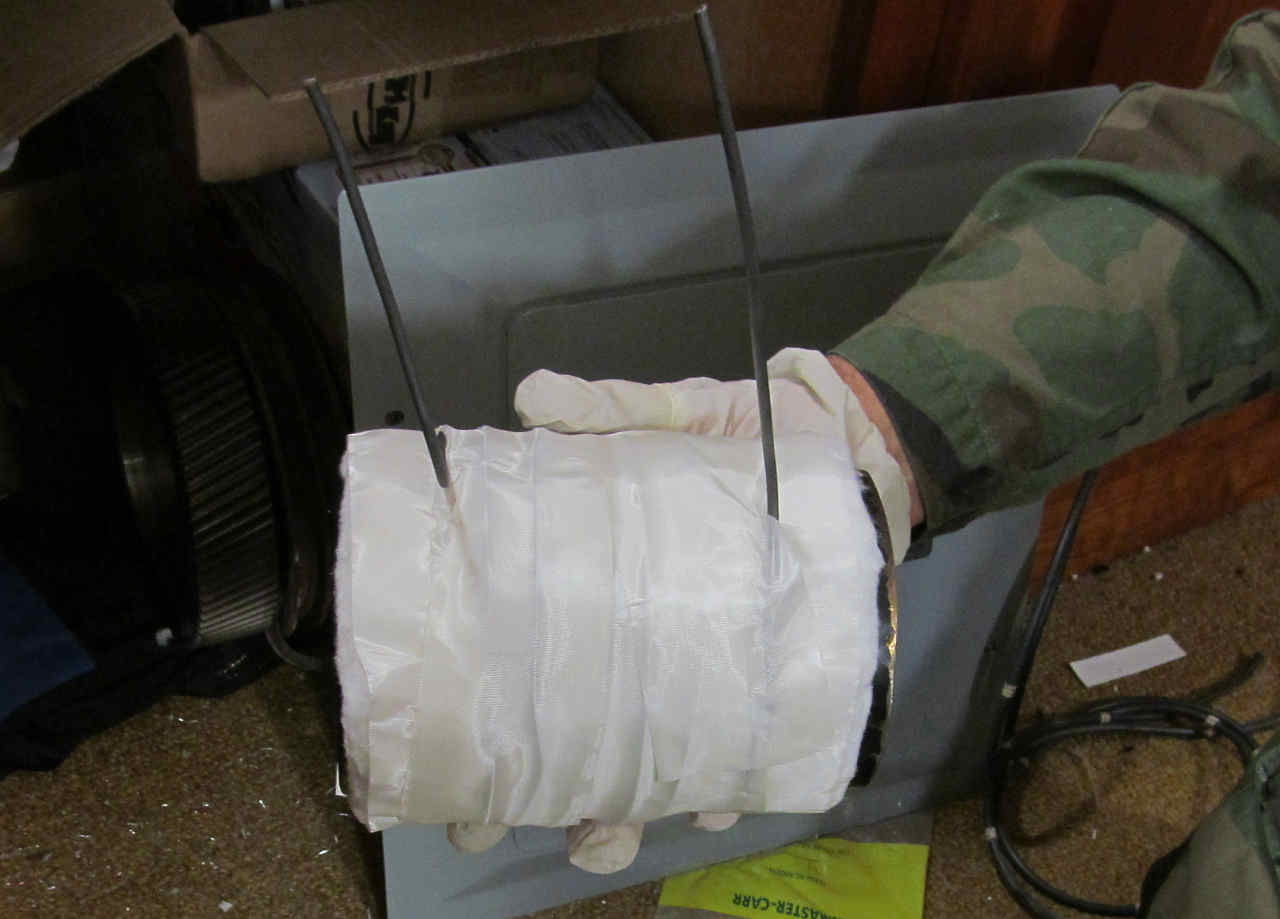
Winding the induction coil
Winding the induction coil. Based on past experience, I judged 6 turns to be just about right. It turns out that 7 turns would be exactly appropriate for the Roy 2500 while 6 are just right for the Roy 1500.
Finished melter assembly
The finished assembly. More fiberglass tape is used to hold the work coil in place. Note that the windings are concentrated toward the bottom of the tank. Heating the bottom most intensely greatly speeds getting that first melt started.
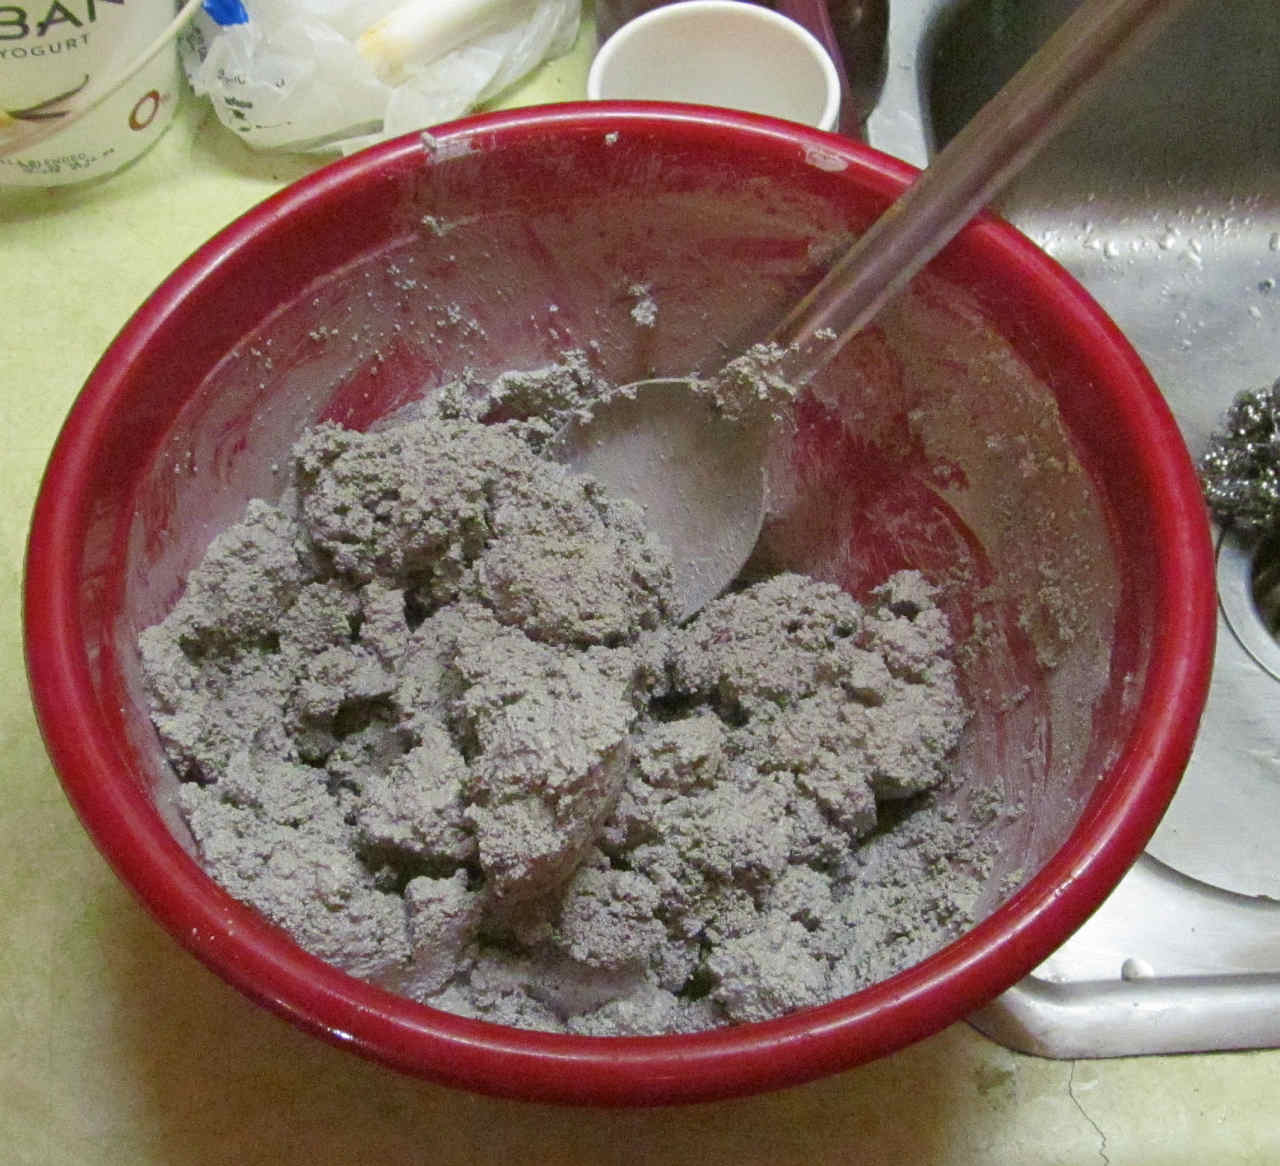
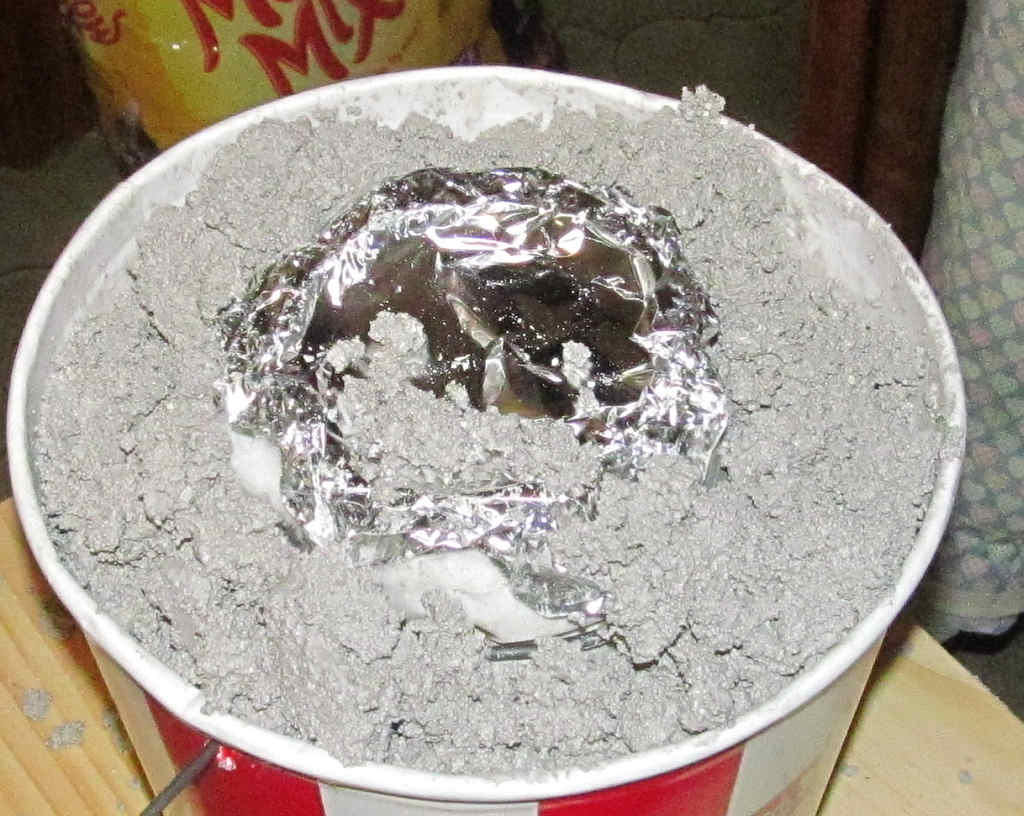
Proper Consistency of Kast-O-Lite
The next step is to mix the refractory. I used some Kast-O-Lite 3000 extreme temperature refractory because I had a spare bag laying around the lab. This is not the optimum refractory – it is heavy and has a relatively high thermal conductivity but it worked OK. I’ll be talking to my friends at Larkin Refractory concerning the optimum refractory and an update will follow.
When using Kast-O-Lite, it must be mixed very dry. Larkin recommends the consistency of oat meal. I did some test casts and found out that a stronger product resulted if less water was used. The photo shows what it should look like. Lumpy but the lumps should adhere to each other if squeezed in the hand.
Greasing the inside of the KFC bucket
Before mixing the refractory, the inside of the KFC bucket should be heavily greased to make the refractory properly release from the mold. Don’t be miserly here, try liquid cooking oil, PAM or anything like that. The refractory will soak it up and you’ll find yourself picking pieces of the bucket off the cured refractory.
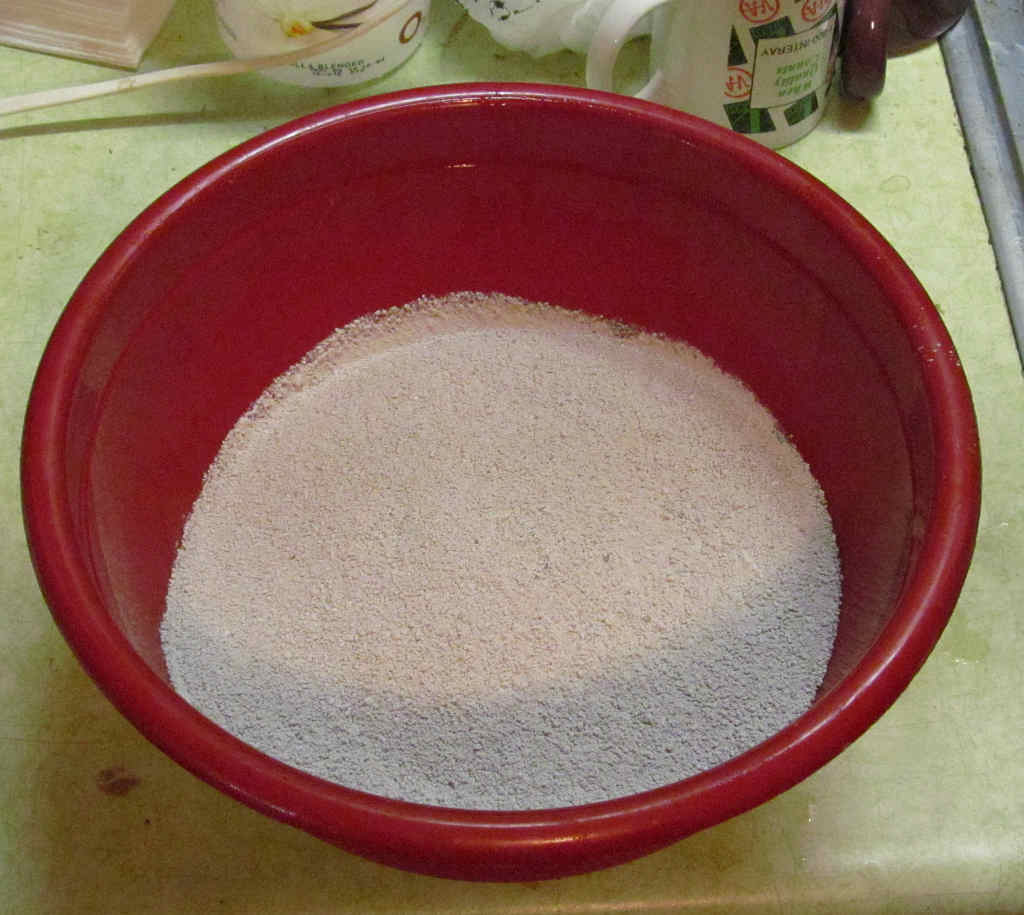
The Dry Refractory
This is what the refractory looks like dry. Like coarse cement mix.

Base layer of refractory laid down
The first thing to do is to lay down the base. This should be several inches thick, thick enough that the opening of the cylinder is level with the opening of the bucket.
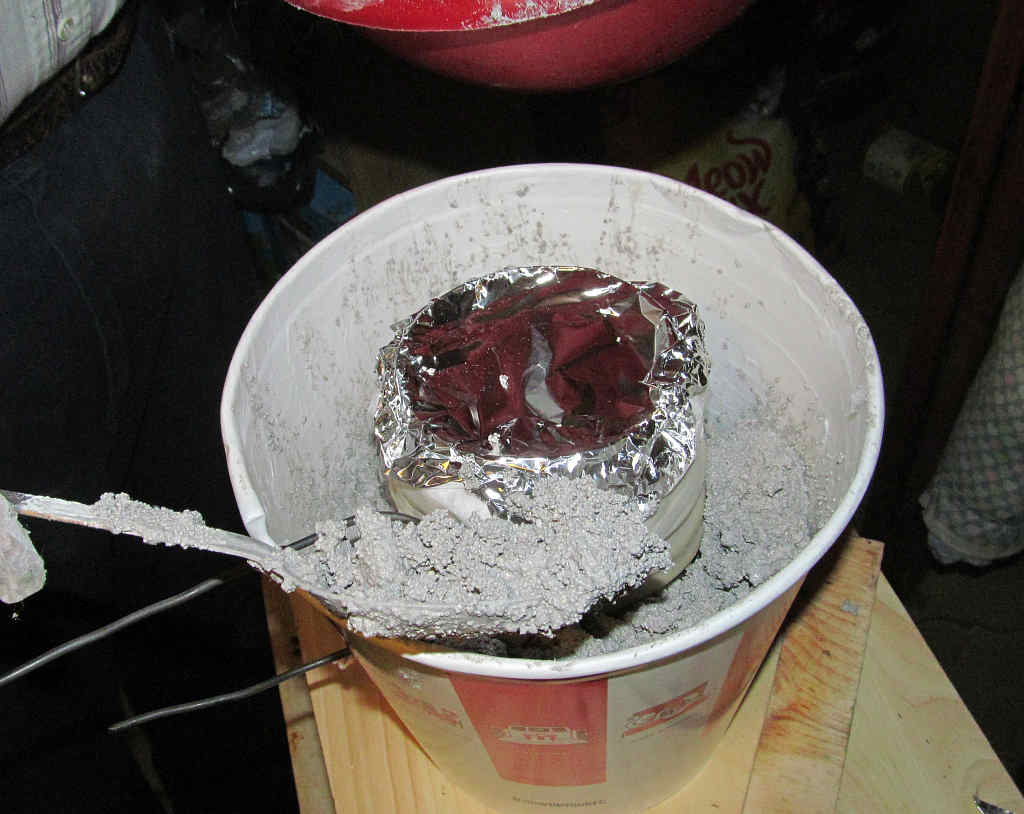
Adding the Kast-O-Lite
Adding the refractory. Again, note how dry the mixture is. The foil cap makes it easy to add the refractory without spilling any into the crucible.
Tamping lightly
About every inch or two of refractory, take a stick or something similar and gently tamp the mixture. Not too hard or the paper bucket will bulge.
The cylinder will tend to work itself off center. If you see that happening, gently tamp on the thinner side. That will work the cylinder back toward the center of the bucket.
Almost done
Almost finished.
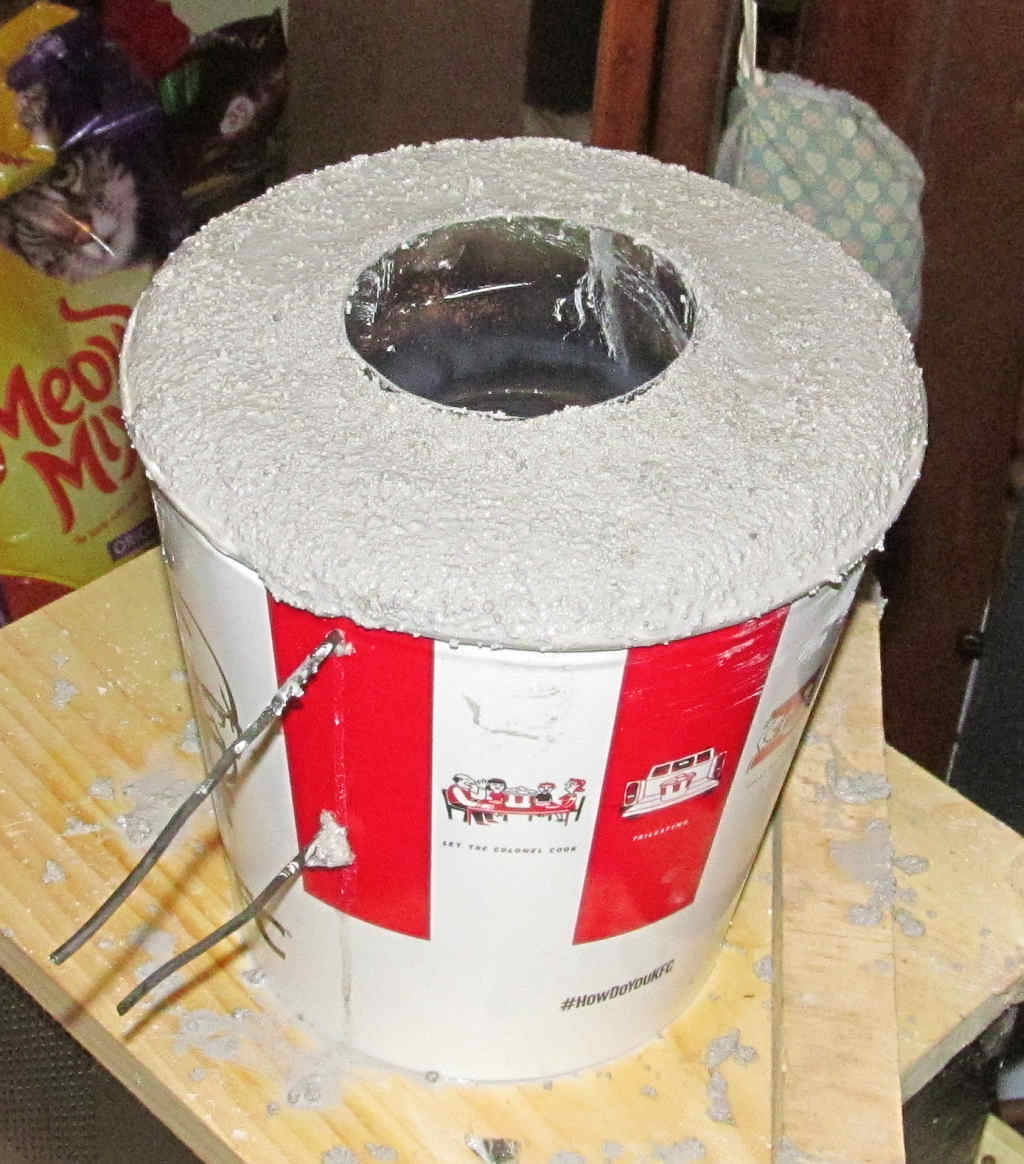
Finished furnace
Finished. Notice how the top is nicely rounded. The instructions say NOT to trowel the mixture smooth. I finished the surface by gently patting it with my gloved hand.
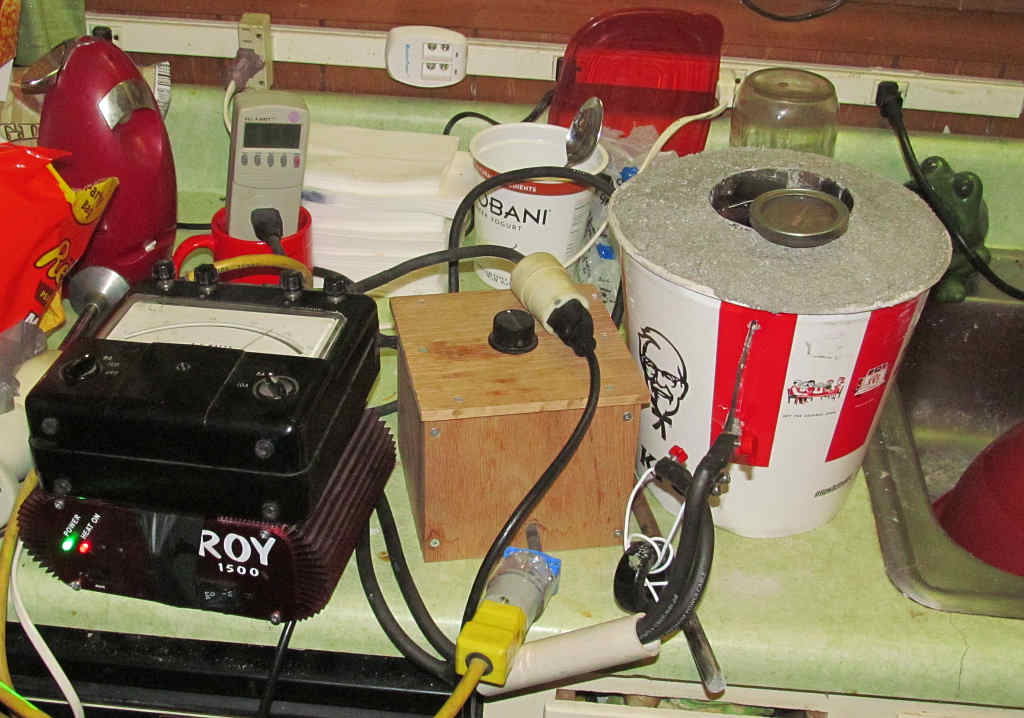
Slowing warming the cured refractory
The refractory is allowed to cure for 24 hours (don’t skimp) and then the assembly is gently heated to drive out the residual moisture.
In this photo the assembly is connected to a 2.2 model Roy and the heat is set to about 100 watts. At this point the bucket is stripped off to allow the moisture to escape out the sides.
The Secret ingredient
Here Matt adds the secret ingredient :-).
Actually it’s just water. We filled the crucible up with water so that it would boil for awhile and hold the temperature at about 210 deg F. That let the heat slowly soak through the refractory.
The refractory instructions say to raise the temperature about 100 deg F per hour. We did that until the interior of the crucible was showing some color. Then we attached the 2500 watt Roy and fired for effect!
Note that if there is enough interest, Fluxeon will sell ready-made furnaces in a variety of sizes. This is a good size for small castings up to about 5 lbs (allowing a pound for the sprue). Next on my agenda is a 20 lb furnace built inside a 5 gallon steel pail. Stay tuned.
Next Instalment: Using the furnace.
—
Posted by neonjohn on November 1st, 2014 under Cool Stuff, Induction heating, Projects
November 3rd, 2014 at 2:25 pm
Very COOL! Nice design but I’m lazy. Is there some way to control the interior (melt) temperature? My idea is to have a small heat treat furnace along with a 20 lb. Aluminum melter. I built a 30 lb. AL furnace with propane/blower heat. Works great but have no real way to control other than wide open or off.
Keep up the great work.
Jon S. in Waldport Oregon
November 3rd, 2014 at 3:13 pm
Hey, Jon,
Yes, there are several ways. If you go the expensive route with the Roy 2500, you simply adjust the front panel power control knob until the temperature stabilizes.
Another alternative is on-off proportional control using a thermocouple in the melt and a PID controller. Chicom made controller are available on sleazebay and quality one are available from Omega Engineering, http://www.omega.com.
The way on-off proportional works is that a cycle time, say, 20 seconds, is set in the controller. The controller provides a contact closure to energize the heater with a duty cycle proportional to the error from setpoint. If the temperature is at the setpoint then the duty cycle might be 20% (4) seconds on and 80% (16 seconds) off. During heat-up the controller is on 100% of the time.
Both the Roy 2500 and the 2.2 accept contact closer inputs so no modification is necessary.
Yet another alternative is to use the 2.2 and a large variac to vary the input voltage to the heater. This is usually an economical option only if you already have the variac.
The PID controller is the best route because it will maintain the exact temperature desired.
For future heaters, I’m designing a PID controller to be built in. There will be a thermocouple connector on the unit. All you have to do is plug in the thermocouple and set the setpoint.
I’m hoping to fit all of this onto the front panel so that it can be added to any of our heaters. Space is tight in that area so success isn’t guaranteed but I’m trying.
Thanks
John
November 10th, 2014 at 8:50 am
Will your induction heater do cast iron / steel?
Thanks!
Jim
November 13th, 2014 at 1:41 am
Hi Jim,
The answer is a qualified yes. Unlike combustion heat where the flame has a maximum temperature, there is no theoretical limit to the temperature an induction heater can reach. Indeed, in the various hot fusion test reactors, induction heat is used to raise the plasma to millions of degrees.
The maximum temperature achievable with a given setup is when the energy input from the heater equals the energy loss from the system. As the temperature rises, Stephan-Boltzman (radiative) losses begin to dominate. The energy lost via radiation rises as the 4th power of absolute temperature so unless one has relatively limitless input power available, one must start worrying about radiative heat loss.
A thick enough quantity of the proper refractory will stop almost all convective and conductive losses. That leaves radiative losses. If even a little bit of the incandescent glow of a white hot object escapes, much energy is lost to radiation. So the key to achieving high temperatures at a given power level are adequate amounts of the appropriate refractory insulation and the blockage of all radiation (light) paths.
I made a crucible out of Light Weight Brick (LFB) in which I melted about a pound of steel. About 2 inches of LFB was adequate thermal insulation. But the steel quickly reacted with the LFB and destroyed it. So a practical setup would require the 2800 deg grade of LFB to be lined with a refractory compatible with steel. I don’t yet know enough about steel melting to know what that is.
A practical problem that you’ll have is that as your assembly becomes larger to hold more melt, the work coil is spaced farther and farther away from the work. The magnetic coupling declines and so more and more amperage must flow in the work coil. We use OFHC (oxygen-free high conductivity) thick wall tubing for the work coil in such situation but water cooling is necessary and all that energy that flows out with the water is lost to heating. That puts a practical cap on how much steel one can melt.
With 1500 watts I melted that pound of steel fairly rapidly – about 10 minutes. Our new 2500 watt Roy should do several pounds at that same speed or perhaps a little longer.
John
November 24th, 2014 at 6:36 am
Somewhat off topic but concerning Al heat treatment.
I am looking for a salt bath to solutionalize (at 525C) a couple of pounds Al(LM25/A356) and commercial salt is not available in Australia (unless you want to import tons). Have some sodium/potassium nitrite/nitrate steel tempering salt but nasty stuff happens at `539C which is a bit close
Argon can get expensive and I was thinking of Li/Na/K carbonate with a MP < 400C – any thoughts apart from the usenet days (sci.metallurgy?)
Any timing on the ROY 2500? – looks a lot safer than crucibles from normal furnaces
November 24th, 2014 at 7:29 am
Quote re steel crucible
“So a practical setup would require the 2800 deg grade of LFB to be lined with a refractory compatible with steel. I don’t yet know enough about steel melting to know what that is”
Quick chat with an old mate from Metallurgy at uni – try a thin Alumina or Zirconia crucible as the liner. Chinese fleabay maybe too thick (they probably will tell you how thick) but they are middlemen and probably don’t know how it will work with steel (neither would a western salesman at the counter)
November 24th, 2014 at 2:18 pm
Hi John,
I’d be a little leery of a thin walled crucible. I have a small zirconia crucible here that I’ve melted a couple of pounds of steel in but I wasn’t trying to pick it up. (just tipped it over to let the iron flow out onto the refractory board.)
There are several excellent foundry oriented mailing lists on Yahoo and a couple of forums. It seems that most hobbyists are using either clay or clay bonded SiC crucibles for iron in combustion furnaces. I have no experience with induction melting any quantity of steel but I would think this would work fine, as the steel itself is easily heated inductively.
John
November 24th, 2014 at 2:26 pm
I can’t help you any on your salt bath problem. I’ve use a sodium/potassium nitrate molten salt bath to blue gun steel (gorgeous deep blue) but back then we were using a large propane burner.
Re: 2500. We have a couple of units in beta testing right now plus I have a production unit that I’m extensively testing. Everything is looking good for a pre-Christmas release.
Keep an eye out here and on the Fluxeon blog. We just hired a guy to upgrade our website and keep the blog updated. We’ll announce as quickly as possible.
John
December 2nd, 2014 at 10:01 pm
[…] and [Matthew] built an induction-heater based furnace and used it to make tasty molten aluminum cupcakes in the kitchen. Why induction heating? Because […]
December 2nd, 2014 at 10:52 pm
[…] and [Matthew] built an induction-heater based furnace and used it to make tasty molten aluminum cupcakes in the kitchen. Why induction heating? Because […]
December 3rd, 2014 at 12:31 am
[…] and [Matthew] built an induction-heater based furnace and used it to make tasty molten aluminum cupcakes in the kitchen. Why induction heating? Because […]
December 4th, 2014 at 5:40 pm
Hi John,
I am working on a project similar to yours and am looking for some advice on how to limit the temperature in the furnace. I noticed that you use the Roy models and they have a power limiter. I am struggling to see how the circuitry is for that affect. I look at the simple induction heater circuit, using 2 resistors, 2 mosfets, a capacitor and 2 diodes and wonder how to limit the power output. I am not as savvy as I would like to be with electronics so I was wondering if I can get some advice from you. Any help is appreciated. Thanks!
-Glenn
December 4th, 2014 at 8:00 pm
Hi Glenn,
First off, let me suggest that you not spend too much time with that simple diode cross-coupled architecture. For several reasons, the Miller effect being the main one, that design will not be reliable above 50-90 volts. You’ll smoke a lot of transistors trying to make it work. I did. That’s why I designed the Roy with the digital driver.
To control temperature, read my answer to the same question several comments up. ON-OFF proportional control using a zero crossing solid state relay is the only way to safely turn a Royer on or off. By that I mean do so and not smoke transistors. My open source heater board has the solid state relay on the board.
http://www.neon-john.com/Induction/Roy/Roy.htm
Controlling the applied DC voltage is the only practical way to control power. In our commercial product I do that with a buck converter driven by the microprocessor that regulates rectified line voltage. You can do it either using a Variac or a buck converter. Here is my simple open source buck converter.
http://www.neon-john.com/Induction/Roy/Buck_Converter.htm
It uses a pot or an input voltage to control the buck converter. You can buy a kit from Fluxeon.com.
You might also want to join the Induction Heating mailing list.
http://lists.neon-john.com/listinfo.cgi/induction-neon-john.com
Low volume list but lots of knowledgeable people hang out there.
John